
The old canvas was dirty and pretty torn up. It is attached to the top of the bus by metal strips with lots of little screws. The beading you see in the picture below is part of the canvas itself.

Here the canvas is off the bus and held in place by clothes pins.

We used our Toyota truck as a convenient step ladder/saw horse.

Before taking the top off, be sure to tie down the various metal parts to avoid scratching the paint of the bus.

Anke helped hold the top in place after the front hinges were removed from the roof and while I was unscrewing the rear supports.

After that it was an easy transfer into the truck bed. The roof is not as heavy as we thought.

Next a thorough cleaning of the roof...

...and the inside and outside of the poptop


We put the roof in the grass to attach the new top.

New and old:

Installation of the new canvas was relatively easy with a simple manual staple gun.

It helps that our bus had these handy rubber tack strips rather than wooden ones:

Ready to go back on the bus:

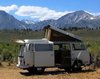
Back in its delivery vehicle

The stapling turned out quite well, except for the two rear corners, which were too tight. We had to remove some staples and reattach the canvas lower.

We were worried about this becoming a weak spot, so Anke used some canvas we had laying around to add reinforcements:


The last step is to go back and put all the screws back in to attach the canvas to the roof of the bus. Not a fun job, especially in the front where there is no room to work.


The end result:


Couple of lessons learned:
1. Make sure to measure the overall height of the canvas at the support legs before stapling in the new canvas.
2. Get a stubby phillips screw driver before you start
3. Ignore the direction of the Just Campers label when installing the canvas (it is upside down on ours)
4. This job is much easier when there are at least two of you.
5. Be sure that the top of the bus, the metal installation strips, and your tools are reasonably clean. Otherwise your new canvas will get dirty right away.
6. All together, plan at least 6-8 hours for this job. We took it easy and divided the job over two pleasant weekend days.