Bus, Microbus, Transporter, Station Wagon, Vanagon, Camper, Pick-Up.
Moderators: Sluggo, Amskeptic
-
gmag69
- IAC Addict!
- Location: Up in smoke man.
-
Status:
Offline
Post
by gmag69 » Wed May 16, 2007 1:26 am
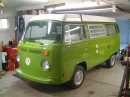
I picked up this new bus from VDubTech a week and a half ago and have started doing some work on it. Here are a few pics.
Loaded on the trailer:


VDubTech and I after we got the doors on and I'm getting ready to come home.

Here it is after I cleaned the moss off some of it.


It needs some work but it'll be nice.
Geno

Check out my Westy Resto thread.
viewtopic.php?t=2063
bretski wrote:...oh, and we just bombed the moon.
-
gmag69
- IAC Addict!
- Location: Up in smoke man.
-
Status:
Offline
Post
by gmag69 » Wed May 16, 2007 1:29 am
Here I started on replacing the nose. I got the nose cut off and most of the left over metal taken off. Here is a few pics.

This is what happens if mice build nests in you fresh air ducts and it isn't cleaned out. This will be replaced with pieces from my '74 parts bus.


Check out my Westy Resto thread.
viewtopic.php?t=2063
bretski wrote:...oh, and we just bombed the moon.
-
gmag69
- IAC Addict!
- Location: Up in smoke man.
-
Status:
Offline
Post
by gmag69 » Wed May 16, 2007 1:31 am
Here I got the front painted up and the passenger side air duct welded in. Here are some pics.


Geno
Check out my Westy Resto thread.
viewtopic.php?t=2063
bretski wrote:...oh, and we just bombed the moon.
-
gmag69
- IAC Addict!
- Location: Up in smoke man.
-
Status:
Offline
Post
by gmag69 » Wed May 16, 2007 1:33 am
Here are some more pics.
Here is the driver's side fresh air duct welded in:

Here is the nose in place with most of the door seams bent over to hold it in place.


Sorry for the dark pics. Was just about dark here when I got done and snapped these.It was fun getting the nose to fit right. I had to hook the passenger's side door lip onto the A pillar and use a ratchet strap hooked to the driver's side bulkhead to pull the nose over enough the bend the door lip over. Then had to put the strap on the passenger side and pull it enough to bend the door flange over there. Looks good. Just need to drill the spotweld holes and weld them up and bend the bottom lip over right above the bumper.Also weld up the A pillars. A word of caution to anyone going to do this.Make sure you get all the old metal off of everwhere before you try and put the new nose on. Even the littlest piece of old metal will throw the nose all out of wack. After this I'm moving on to either the driver's dogleg or the Floor behind the bed that needs patched. Haven't decided yet. Keep watching for pics. I'll update as I go.
Geno
Check out my Westy Resto thread.
viewtopic.php?t=2063
bretski wrote:...oh, and we just bombed the moon.
-
gmag69
- IAC Addict!
- Location: Up in smoke man.
-
Status:
Offline
Post
by gmag69 » Wed May 16, 2007 1:35 am
The front nose welded on. =D> I hope to god I never have to do that again.

Here are a few pics.
Light and grill installed.

windshield Temp setting in there to keep any rain out.

Door seam all crimped over. Kind of hard to see sorry

I'm not sure what I'm going to do next but I will post pics as soon as I figure it out. Any questions don't be afraid to ask. I'll answer them the best I can.
Geno
Check out my Westy Resto thread.
viewtopic.php?t=2063
bretski wrote:...oh, and we just bombed the moon.
-
gmag69
- IAC Addict!
- Location: Up in smoke man.
-
Status:
Offline
Post
by gmag69 » Wed May 16, 2007 1:38 am
Well I had a doctors app. yesterday morning after work so when I got home I figured I'd try out this tool I barrowed from the garage at work.

This is a window seal tool. If you can find one get it you won't be sorry. I popped the windows out of the blue bus and put them in the new one.

If you have sliders it may not be a good idea to use it on those.The window frame sets so close to the pinch weld that it ripped the hell out the seal. It might not do that with new seals. Mine are probably the originals so they are brittle. I plan to replace the seals anyway so it doesn't matter to me. It's just to keep the rain out for now. The back driver's window went right in no problem. I left the passenger's side one out for now. The window frame needs some work there so I don't know if I'll put it in yet or not. Thought I'd share .
Geno
Check out my Westy Resto thread.
viewtopic.php?t=2063
bretski wrote:...oh, and we just bombed the moon.
-
gmag69
- IAC Addict!
- Location: Up in smoke man.
-
Status:
Offline
Post
by gmag69 » Wed May 16, 2007 1:39 am
OK here I got the Passenger side back window frame cleaned down and primed and the glass put in.It had a few small rust holes in it so I used some JB weld to plug the holes after it was wire wheeled down. I bet I'll get flamed for that one.
It only took about 20 mins to do. Here are pics of the window in.


A hell of alot better then the garbage bags.
I have to pull the long strip that hold the cover for the back door track off and weld it to this one. it is totally gone. Should be an easy job.
Starting to look like a bus again.

Geno
Check out my Westy Resto thread.
viewtopic.php?t=2063
bretski wrote:...oh, and we just bombed the moon.
-
poptop tom
- Old School!
- Location: La Porte, IN
-
Status:
Offline
Post
by poptop tom » Wed May 16, 2007 5:03 am
Right on, Geno! Great progress. =D>
You have your hands full it appears.
Mr. Blotto wrote, "Boy - thanks for the offer, but a month in poptop tom's world means 5 years"
-
Ryno
- IAC Contributor

- Location: Lake Geneva, WI
-
Status:
Offline
Post
by Ryno » Wed May 16, 2007 6:24 am
Man...What a project!....Looking good!
Ryan
1985 Westfalia
-
bretski
- Ellipsis-Meister

- Location: out of hibernation...for now
-
Status:
Offline
Post
by bretski » Wed May 16, 2007 6:29 am
Nice work!!!!!!
1978 Deluxe Westfalia - "Klaus"
"transcripts are overrated. hardware store receipts: those are useful." --skin daddio
-
hambone
- Post-Industrial Non-Secular Mennonite
- Location: Portland, Ore.
-
Status:
Offline
Post
by hambone » Wed May 16, 2007 8:22 am
Holy crap! I bow to you...that's no easy task but you've taken it on mightily. I enjoyed the pics "they tell a thousand words"
-
regalasr
- Getting Hooked!
- Location: Los Angeles, Cali
-
Status:
Offline
Post
by regalasr » Wed May 16, 2007 9:42 am
I wish I could do that

I got all the baywindow parts
-
Amskeptic
- IAC "Help Desk"

-
Status:
Offline
Post
by Amskeptic » Wed May 16, 2007 11:05 am
gmag69 wrote:
I used some JB weld to plug the holes after it was wire wheeled down. I bet I'll get flamed for that one.
Not from me, you won't. . . I got 77,000 miles of JB Weld holding in a chewed-up gallery plug behind the flywheel, ouch.
I admire your dogged adventurism.
Colin
BobD - 78 Bus . . . 112,730 miles
Chloe - 70 bus . . . 217,593 miles
Naranja - 77 Westy . . . 142,970 miles
Pluck - 1973 Squareback . . . . . . 55,600 miles
Alexus - 91 Lexus LS400 . . . 96,675 miles
-
gmag69
- IAC Addict!
- Location: Up in smoke man.
-
Status:
Offline
Post
by gmag69 » Wed May 16, 2007 2:45 pm
Thanks for the kind words. This bus is going to be an adventure. It was a gutted shell as you can see and I'll be pulling everything out the blue bus and putting into this one. This one is alot nicer body wise and will require alot less money to get looking nice. I will be getting rid of the the blue one once I get it stripped down to nothing.
I wish I could get some lead to do the patching instead of the JB Weld but that is what I have on hand so I'll be using it.

I'll post more pics as I go along. Keep an eye open for the updates.

Geno
Check out my Westy Resto thread.
viewtopic.php?t=2063
bretski wrote:...oh, and we just bombed the moon.
-
Birdibus
- IAC Addict!
- Location: Inland SoCal
-
Status:
Offline
Post
by Birdibus » Wed May 16, 2007 4:44 pm
Geno, where did you get the sheet metal for the front? (I wonder why it has a rounded spot for the emblem.) Wow, I wish I could weld. Sure is looking good! About the cover for the sliding door rail... doesn't that just screw in?
71 bus, 74 westy