Rear Side Marker Area Repair - 1978 Bus

Moderators: Sluggo, Amskeptic

User avatar
bretski
Ellipsis-Meister
Ellipsis-Meister
Location: out of hibernation...for now
Status: Offline

Post by bretski » Thu Aug 13, 2009 7:29 pm

chitwnvw wrote:How'd you put the paint on? Brush or spray?
L13A in a rattle can. :)

Just came in from first round of wet sanding. Got the majority of the primer ridge knocked down; a couple more light coats and some feathering, and it'll be a 10 footer...

Image
1978 Deluxe Westfalia - "Klaus"

"transcripts are overrated. hardware store receipts: those are useful." --skin daddio

User avatar
Ritter
IAC Addict!
Location: Sonoma County, CA
Status: Offline

Post by Ritter » Thu Aug 13, 2009 8:38 pm

How do you get rid of that pretty square? I've got similar on a "repair" I did in (believe it or not) the top rear corner. PO backed into a tree....

(click for something larger)

[albumimg]2744[/albumimg]
1978 Westfalia 2.0 FI

User avatar
bretski
Ellipsis-Meister
Ellipsis-Meister
Location: out of hibernation...for now
Status: Offline

Post by bretski » Thu Aug 13, 2009 9:13 pm

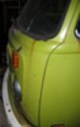
Well, the square is where I masked and taped for primer. It's also where I put down the first coat of color. The dark outline is primer pigment.

I used 320 and 600 grit to smooth it out. It still needs a little more work, but it's pretty level now. When I put down the next coat, I'll go out wider with the paint, feathering it into the existing paint. Then I'll wet sand with 1000 and 2000 grit, followed by polish. It should be "good enuf" for this bus pilot by that point. Klaus is no trailer-qu...er...king, and likely never will be. :king:

Ritter, your repair doesn't look bad, the tint is just a little different. No biggie, in my mind. I am just trying to ward off the monster that never sleeps. Heck, you should see the dent that my PO left me in the back of the driver's side scoop...
1978 Deluxe Westfalia - "Klaus"

"transcripts are overrated. hardware store receipts: those are useful." --skin daddio

User avatar
Runamuck Bus
Getting Hooked!
Location: Western PA
Status: Offline

Post by Runamuck Bus » Fri Aug 14, 2009 5:31 am

Cut to the chase! Just Kidding, I am interested in the wiring for that side marker. In amongst all of the assorted 'tail light' wiring pozers I am dealing with, I eventually intend to have side markers myself someday (perhaps when I grow up!). Truth of the matter is, I disconnected the rears lights eons ago (for battery tray and body issues) and now it just doesn't make sense (neither do the wiring diargams - but they sure are pretty). So, if you get a chance or got a moment, a picture of the wires or a statement on the connections would be greatly appreciated (this offer is open to all parties).
Endeavor to Persevere.
'72 Weekender

User avatar
bretski
Ellipsis-Meister
Ellipsis-Meister
Location: out of hibernation...for now
Status: Offline

Post by bretski » Fri Aug 14, 2009 5:53 am

Hot wire for the side marker comes out of the base of the tail light assembly. There are two wires that come out of the bottom: One is the hot (black) for the side marker, the other is the ground for the tail lights (brown). There is a grounding block with spade connections on the engine lid side of the tail light assembly. You'll need a second ground wire to run from the side marker to this grounding block.

I'll try to get a picture today.
1978 Deluxe Westfalia - "Klaus"

"transcripts are overrated. hardware store receipts: those are useful." --skin daddio

User avatar
Ritter
IAC Addict!
Location: Sonoma County, CA
Status: Offline

Post by Ritter » Fri Aug 14, 2009 8:35 am

bretski wrote: I used 320 and 600 grit to smooth it out. It still needs a little more work, but it's pretty level now. When I put down the next coat, I'll go out wider with the paint, feathering it into the existing paint. Then I'll wet sand with 1000 and 2000 grit, followed by polish.
So steps are 1) rust treatment, 2) primer, 3) coat of paint, 4) sand (what grit), 5) coat of paint, 6) wetsand, 7) polish?

Just what does "wetsand" mean? When the paint is wet? Get the sand paper wet? Sand until your brow is dripping wet? Sand only if your beer bottle is collecting condensation wet? And by "feathering" do you mean paint coat with no masked area?

Yeah, the tint is a bit off. Ordered from Paint Scratch.com. It's ok for my rust abatement purposes, at least it beats gray primer patches all over the place!
1978 Westfalia 2.0 FI

User avatar
Runamuck Bus
Getting Hooked!
Location: Western PA
Status: Offline

Post by Runamuck Bus » Fri Aug 14, 2009 9:00 am

From:
http://www.mobileworks.com/wet_sanding.html

" The term "wet sanding" is just that. The panel you are working on is lubricated with water as well as the paper itself. Some brands of paper must be pre- soaked for a specific time period before they may be used. Other companies make paper that just needs a quick dip in a bucket of water before you may begin. You should have a water bucket to soak the papers in, adding just a couple of drops of soap for better lubrication. You will also need a sanding block to back the paper, made of some type of foam or soft rubber, to distribute even pressure across the panel. Don't use your hand or fingers to back the paper because it will create uneven pressure and may lead to sanding through the paint faster. Keep a spray bottle filled with water handy to keep the area wet. A clean dry towel will be needed to wipe off the area to check on your progress.

"
I'll do just about anything to get a picture of that wiring!
Endeavor to Persevere.
'72 Weekender

User avatar
bretski
Ellipsis-Meister
Ellipsis-Meister
Location: out of hibernation...for now
Status: Offline

Post by bretski » Sat Aug 29, 2009 6:04 pm

Life has been getting in the way of progress on this project, but I got the new seals made today. I used 3/32" ID vacuum hose from the FLAPS. Two feet cost me $1.52 + tax.

Measuring the perimeter of the bulb base:

Image

So, a foot of hose per bulb base was more than enough. Using 2 pieces of wood as a jig, I cut the hose down the center with a razor blade. Here you can see the test fit:

Image

Trimmed to size:

Image

Cleaned the bases up with a little bleach solution and an old toothbrush, replaced the seal, and welded the seam with some rubber cement. Here you can see the finished product next to the old crusty seal. I think this will work very well...

Image
1978 Deluxe Westfalia - "Klaus"

"transcripts are overrated. hardware store receipts: those are useful." --skin daddio

User avatar
Bookwus
IAC Addict!
Location: City of Roses
Status: Offline

Post by Bookwus » Sat Aug 29, 2009 7:38 pm

Hiya Bret,

Damn good idea on using the hose for a gasket. Damn good! I'm gonna have to do that myself. Thanks for the inspiration!
I have cancer.

It does not have me.

User avatar
metric Cwrench
Getting Hooked!
Location: albion, mi
Status: Offline

Post by metric Cwrench » Sat Aug 29, 2009 7:44 pm

great work and post bretski! thanks for all the ideas, i'm planning on using several of them when i get that far.

great idea using vacuum hose for seal material. i love it, and am thinking of other options to put it to use.

User avatar
chitwnvw
Resident Troublemaker
Location: Chicago.
Status: Offline

Post by chitwnvw » Sat Aug 29, 2009 7:50 pm

Anyone have any good ideas for affixing the side light assembly to the body. The new ones have .push clips that are too short and the old ones are brittle and tend to snap

User avatar
Bookwus
IAC Addict!
Location: City of Roses
Status: Offline

Post by Bookwus » Sat Aug 29, 2009 9:31 pm

Hiya chi,

I popped out those clip thingies and just replaced them with nuts and bolts. I'm thinking that works a whole heckuva lot better than the clip business.
I have cancer.

It does not have me.

User avatar
bretski
Ellipsis-Meister
Ellipsis-Meister
Location: out of hibernation...for now
Status: Offline

Post by bretski » Sun Aug 30, 2009 5:06 am

Thanks for the positive comments. I'm going to do a test fit today once I'm sure the rubber cement is cured.

Chitwn: Like Mike stated above, I'm planning to use nuts and bolts for the plastic clips that have broken. Maybe with a rubber washer for good measure.
1978 Deluxe Westfalia - "Klaus"

"transcripts are overrated. hardware store receipts: those are useful." --skin daddio

User avatar
hambone
Post-Industrial Non-Secular Mennonite
Location: Portland, Ore.
Status: Offline

Post by hambone » Sun Aug 30, 2009 9:15 am

Looks really good! Man I've been there a million times.
Good enough is good enough. I've got a few rust chips on the nose with a slight ridge after masking. Ahh the hell with it. At least it won't rust thru anymore.
What kind of wheel did you use on your drill? I've always done that by hand with a screwdriver and file, then sandpaper. Too much work.
http://greencascadia.blogspot.com
http://pdxvolksfolks.blogspot.com
it balances on your head just like a mattress balances on a bottle of wine
your brand new leopard skin pillbox hat

User avatar
metric Cwrench
Getting Hooked!
Location: albion, mi
Status: Offline

Post by metric Cwrench » Sun Aug 30, 2009 10:17 am

when i was looking at my old side lights, it seemed to me the best thing to do is cut off the plastic tabs (what's left of them, anyway) and find bolt, nut and rubber washers to use in replacement. i'm also painting the plastic interior with chrome/silver paint to increase reflectivity (works nice on taillights), doing that in turn to all my light housings.

Post Reply