engine tin cleaning and painting
- metric Cwrench
- Getting Hooked!
- Location: albion, mi
- Status: Offline
engine tin cleaning and painting
hello y'all, i've got a question:
while i'm waiting for engine parts to arrive and taking a break from the bastardly exhaust pipes (see: "78 westy undergoes therapy"), i'm wanting to clean up and paint my engine tin. lots of surface rust on most pieces, and grime too.
figured i'd begin with dish soap and water, get the grime and gunk out of the way, then proceed to use the aircraft stripper solution. after the paint's off, i'll wash the pieces again and let dry, then i'll sand out the rust by hand, finishing the job with some high heat primer and paint (got the paint and primer from a friend who thought i should paint my engine, but i'm thinking the engine itself probably should be left w/o paint)
is this a rational approach? anyone got better ideas? thanks in advance,
-phred
- sped372
- IAC Addict!
- Location: Waunakee, WI
- Status: Offline
You could go that route and it would work to clean 'em up and give them a fresh look. Honestly though, sand blasting is the way to go. I've done it both ways and after blasting I felt slightly embarrassed by how much time I spent mucking around with removing the old paint by hand.
1971 Karmann Ghia - 1600 DP
1984 Westfalia - 1.9 WBX
1984 Westfalia - 1.9 WBX
- metric Cwrench
- Getting Hooked!
- Location: albion, mi
- Status: Offline
-
vdubyah73
- IAC Addict!
- Status: Offline
Putty knife to scrape off gunk and crud. Paint thinner or brake cleaner and scrub brush, then wire brush. Use paint thinner because it's cheap and you'll need a lot if the tins are really thick with crud, use a can of brake cleaner to clean up the thinner residue. Use the same brand primer and paint for best results. I like to use an engine enamel as it is more resistant to oil and gas spills.
1/20/2013 end of an error
never owned a gun. have fired a few.
never owned a gun. have fired a few.
- metric Cwrench
- Getting Hooked!
- Location: albion, mi
- Status: Offline
thanks, vdubyah73. i've already done some scraping to get the thickest gunk off (the worst of it acutally came off during tin removal- rusty screws required heat, which in turn slowly burned off the grime near the screws). i've got lots of mineral spirits available, so i'd been planning on using some of that after the initial dish-soap and water cleaning.
do i need to get all the old paint off? or just rough it up some with sanding before painting?
i've got high heat primer and paint (same brand, good to 500*+ according to the label- i'm thinking it's rustoleum). it's engine enamel, and should hold up to the oil, gas and other stuff it'll likely encounter.
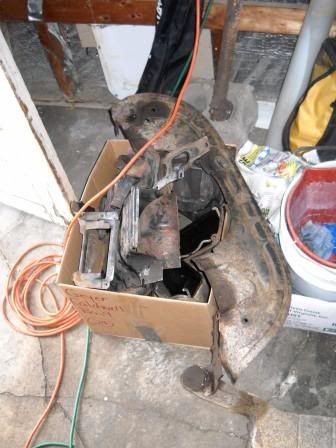
my box o tin awaiting further attention...

- bretski
- Ellipsis-Meister

- Location: out of hibernation...for now
- Status: Offline
I wouldn't worry about trying to get all the old paint off. Rough-up the solid paint, then prime and top-coat.
Like Bill said, paint thinner is great for getting gunk off.
http://itinerant-air-cooled.com/viewtop ... highlight=
Note the Kleen Strip formulation Don talks about...works great!
Like Bill said, paint thinner is great for getting gunk off.
http://itinerant-air-cooled.com/viewtop ... highlight=
Note the Kleen Strip formulation Don talks about...works great!
1978 Deluxe Westfalia - "Klaus"
"transcripts are overrated. hardware store receipts: those are useful." --skin daddio
"transcripts are overrated. hardware store receipts: those are useful." --skin daddio
- Bookwus
- IAC Addict!
- Location: City of Roses
- Status: Offline
Hiya met,
What Bretski said! That Kleen Strip is pretty awesome stuff. If you go that route use thick rubber gloves. You wouldn't believe how much that stuff stings if you get it on your skin.
On a side note, I had a lot of fun with electrolytic rust removal. Take a look...........
http://www.instructables.com/id/Electro ... aka-Magic/
When I tried this on my engine tin (it had to be reasonably clean beforehand, no built up grease or gunk) it would not only convert/remove rust but would also strip the paint off the piece. It is slow, but definitely VERY useful in trying to remove rust/paint from an interior surface like a tube.
I have cancer.
It does not have me.
It does not have me.
- metric Cwrench
- Getting Hooked!
- Location: albion, mi
- Status: Offline
oh, that's cool! any chance to play with electricity and let simple chemistry do the work for me is fun and good. i'll have to try that out, pretty sure i've got enough stuff around to do it without buying anything. problem is gonna be finding a large enough tub to use, and a place i could let it run (outside to prevent hydrogen buildup and big big boom) for a few days. hmmm...
gotta work that out, if nothing else it's cool science stuff (oh, how i miss high school chem and physics experiments).
gotta work that out, if nothing else it's cool science stuff (oh, how i miss high school chem and physics experiments).
- Bookwus
- IAC Addict!
- Location: City of Roses
- Status: Offline
Hiya Met,
Yeah, I'm right there with you.
It is a bit of a hoot. The hydrogen bubbles off the piece and it's just cool. I have a converter (110AC to variable amounts DC) and it took about 2 hours at 12 volts to loosen up the paint and scour the rust.
Interestingly, the bare metal comes out looking as though it just come off the press. In most cases all i had to do was a little light brushing with a brass brush and hose it off. Ready for primer.
I made my tank out of an old Home Depot plastic bucket (as shown in the link above) and it did the job nicely.
I have cancer.
It does not have me.
It does not have me.
- metric Cwrench
- Getting Hooked!
- Location: albion, mi
- Status: Offline
well, i got the tin cleaned up using mineral spirits (i had a tub of this around for other goodies i'd been cleaning) and wire brush and a bit of emery cloth. oh, big help was soaking tin for 2 days in a bath of water and soap (dish detergent, lots of it)- loosened everything up nicely.
painted with chassis saver (like por15), because it's impervious to rust, oil, gas, and a load of other potential tin-destroyers. put on two coats, it's gloss black, so it looks pretty good (i'd rather have used flat, but i didn't have any).
now it's down to finishing up the housing, i've used the wire brush on the grinder on open areas with success, need to dig out the dremel to get at the smaller, hard-to-reach spots. will paint with the rustoleum eng primer and enamel (chassis saver not good for aluminium). i'll post pics soon as i've got that done.
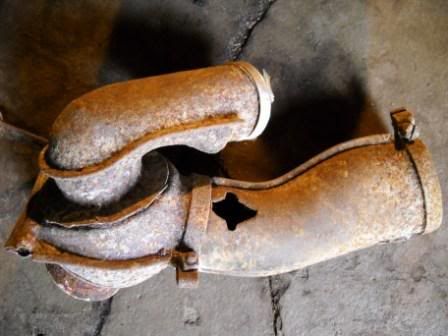
bookwus- i'm gonna try the electolysis on my heat control boxes and associated tubing, they are in desperate need of rust treatment and that's the only way i think i can save them (that post will be in "bypass heat options" in the type2 forum).
- Bookwus
- IAC Addict!
- Location: City of Roses
- Status: Offline
Hiya met,
By all means let us know how it turns out for you. And have fun playing Mr. Wizard.
Yeah, although it is fun (and pretty easy) I'm not really sure just how effective electrolytic removal is when compared to more conventional mechanical means. However, electrolysis comes into its own when one is trying to remove rust in an area which precludes mechanical means. Tubing and other enclosed area were made for this approach.metric Cwrench wrote:.....bookwus- i'm gonna try the electolysis on my heat control boxes and associated tubing, they are in desperate need of rust treatment and that's the only way i think i can save them (that post will be in "bypass heat options" in the type2 forum).
By all means let us know how it turns out for you. And have fun playing Mr. Wizard.
I have cancer.
It does not have me.
It does not have me.
- RSorak 71Westy
- IAC Addict!
- Location: Memphis, TN
- Contact:
- Status: Offline
- Amskeptic
- IAC "Help Desk"

- Status: Offline
I still feel embarrassed by the time I spend, I just have never found a sandblast cabinet near by when I need one.sped372 wrote:You could go that route and it would work to clean 'em up and give them a fresh look. Honestly though, sand blasting is the way to go. I've done it both ways and after blasting I felt slightly embarrassed by how much time I spent mucking around with removing the old paint by hand.
Colin
(how is the bug?)
BobD - 78 Bus . . . 112,730 miles
Chloe - 70 bus . . . 217,593 miles
Naranja - 77 Westy . . . 142,970 miles
Pluck - 1973 Squareback . . . . . . 55,600 miles
Alexus - 91 Lexus LS400 . . . 96,675 miles
Chloe - 70 bus . . . 217,593 miles
Naranja - 77 Westy . . . 142,970 miles
Pluck - 1973 Squareback . . . . . . 55,600 miles
Alexus - 91 Lexus LS400 . . . 96,675 miles
- metric Cwrench
- Getting Hooked!
- Location: albion, mi
- Status: Offline
i could put a blasting cabinet to good use, but i don't have access to one. oh well, grinding, brushing and sanding by hand make me closer to my vw, and i find i'm paying a great deal of attention to what i'm doing.
here's some of the tin, fuel tank, and the cover plate from the heat duct to the front of the passenger cabin (behind the front seats, in the floor).
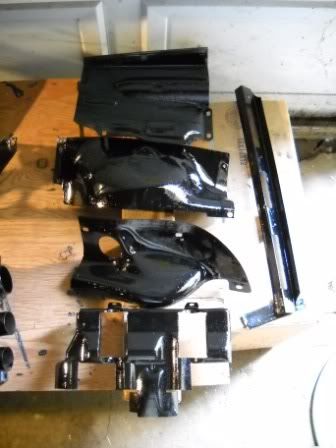
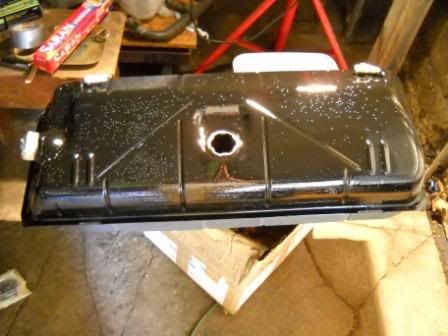
this is just one coat, the bubble-looking spots on the tank photo are not as bad as they appear (high gloss don't help just yet, after another coat it'll be fine). they look beautiful after 2nd coat, if you don't worry about a few wierd dents and such- hey, it's a 30+ yr old vehicle!
here's some of the tin, fuel tank, and the cover plate from the heat duct to the front of the passenger cabin (behind the front seats, in the floor).


this is just one coat, the bubble-looking spots on the tank photo are not as bad as they appear (high gloss don't help just yet, after another coat it'll be fine). they look beautiful after 2nd coat, if you don't worry about a few wierd dents and such- hey, it's a 30+ yr old vehicle!
- metric Cwrench
- Getting Hooked!
- Location: albion, mi
- Status: Offline
oops, fast fingers and no double-check before posting that last one, here's the big tin pieces over the heads:
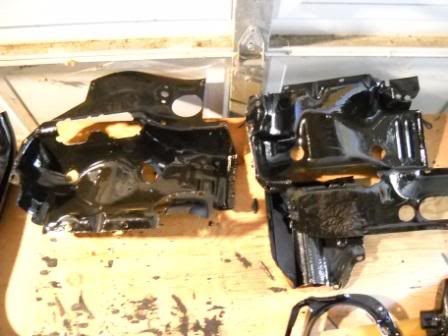
that's a bit of dust marring the beauty of the tin, i just touched up a few spots elsewhere on these two pieces, wiped them off before coating. only thing about gloss is that everything stands out- fingerprints, dust, etc. i freaked out at first, but now i understand it. just think what it'll do to oil, gas and grime that tries to build up there! off it comes with a quick spray. oh, i can't wait.

that's a bit of dust marring the beauty of the tin, i just touched up a few spots elsewhere on these two pieces, wiped them off before coating. only thing about gloss is that everything stands out- fingerprints, dust, etc. i freaked out at first, but now i understand it. just think what it'll do to oil, gas and grime that tries to build up there! off it comes with a quick spray. oh, i can't wait.
