identifying oil leak sources (w/pictures) *updated*

Moderators: Sluggo, Amskeptic

User avatar
airkooledchris
IAC Addict!
Location: Eureka, California
Contact:
Status: Offline

identifying oil leak sources (w/pictures) *updated*

Post by airkooledchris » Thu Feb 19, 2009 3:30 pm

81 aircooled vanagon

summary:
im pulling the transmission this weekend to get to the main flywheel seal and replace it. I don't want to have to take all of this apart again later by missing anything else that needs to be done while I have half this stuff taken apart.

I also wanted to get some good pictures of everything before I clean it all up, so I can (hopefully) get some advise based on these images as to what else needs to be replaced.

My problem is that the main seal leak is so dirty and nasty, and has been going on since September of 2008, that I don't know whats covered in oil from that one bad seal and what might be a completely different problem.

any and all tips, suggestions and misc tomfoolery is as always, quite welcomed.


Image


Image


Image


Image


Image


Image


Image


Image


Image


Image


Image
1979 California Transporter

User avatar
Amskeptic
IAC "Help Desk"
IAC "Help Desk"
Status: Offline

Post by Amskeptic » Thu Feb 19, 2009 3:42 pm

That all looks like classic tired engine with blowby ventilating at the dipstick. The front seal area needs a new Viton front seal, installed slightly short to prevent it from aligning with any groove on the flywheel. The flywheel has a graphite o-ring in the recess at the mating surface to the crankshaft, and this must be replaced as well when you are trying to nail down generalized leakiness. The crankcase shows signs of oil leaking between the cylinder barrels and the case itself, there is nothing to be done about that but spray it clean every once in a while. . . until overhaul time when you use Permatex Aviation on the .010" shims. Each lower cylinder head stud must be sealed where it goes into the rocker box. The washers are normally coated with sealant at time of assembly as well as the thread where the nuts cinch down.
Colin
BobD - 78 Bus . . . 112,730 miles
Chloe - 70 bus . . . 217,593 miles
Naranja - 77 Westy . . . 142,970 miles
Pluck - 1973 Squareback . . . . . . 55,600 miles
Alexus - 91 Lexus LS400 . . . 96,675 miles

User avatar
airkooledchris
IAC Addict!
Location: Eureka, California
Contact:
Status: Offline

Post by airkooledchris » Thu Feb 19, 2009 4:16 pm

thanks Colin. Im hoping to get this messy stuff all wrapped up well before our visit so I can get more of the fine tuning done (during our session) just in time for the summer camping opportunities.

given the above, my parts list includes:
Flywheel O-Ring
Input Shaft Seal
Felt Washer For Flywheel
&
Crankshaft Main Seal

the only vanity item on my list is a set of stainless tinware screws, since a 3rd of mine are missing currently.
1979 California Transporter

User avatar
Gypsie
rusty aircooled mekanich
Location: Treadin' Lightly under the Clear Blue!
Status: Offline

Post by Gypsie » Thu Feb 19, 2009 5:06 pm

I may be missing something but it sounds like the engine will be out of the bus.
If you're changing seals on both ends why not do the oil cooler seals as well?

Dipstick o-ring at the case?
So it all started when I wanted to get better gas mileage....

User avatar
airkooledchris
IAC Addict!
Location: Eureka, California
Contact:
Status: Offline

Post by airkooledchris » Thu Feb 19, 2009 5:32 pm

the transmission is coming out, not the motor.

its a Vanagon and the transmission is much easier to pull than the motor, so people usually just pull the trans to do the flywheel seal. less stuff to unhook I guess.

also, I don't know for sure that I need to do the one on the fan side of the case. im not clear that that one is actually bad. If I look direct at the fan itself it looks clean, but as you can see under the fan on that lower engine mount it's covered in oil. I can't really tell where that is coming from, as it could just be from the mess coming from the rear flywheel seal, which has been caking everything from that point back to the exhaust since last September.

As for the dipstick leak, that dipstick never stays seated. im thinking about trying to clamp down that little tube a little so it seats in tighter. it doesn't seem like anything is missing, I think its just supposed to magically hold its position. I checked the ETKA software and didn't see any additional seals here.
1979 California Transporter

User avatar
Gypsie
rusty aircooled mekanich
Location: Treadin' Lightly under the Clear Blue!
Status: Offline

Post by Gypsie » Thu Feb 19, 2009 5:50 pm

I have a vanagon and the dipstick tube has a tab that holds it to the fan housing. If it is properly bent and secured the pressure holds it down so the oring is sealed.


Methinks the culprit is near at hand....

Amskeptic wrote:That all looks like classic tired engine with blowby ventilating at the dipstick.
Colin

Nice to know about the Tranny removal. Thus far I have always dropped the engine to get at the parts I need to attend to. I once had to reseat the oil cooler and pulled it all apart without dropping the engine to get at them. See if you can get the right angle (from under the driversside) to look at the oil cooler area. Probly not but worth a look.
So it all started when I wanted to get better gas mileage....

User avatar
airkooledchris
IAC Addict!
Location: Eureka, California
Contact:
Status: Offline

Post by airkooledchris » Thu Feb 19, 2009 6:01 pm

Gypsie wrote:I have a vanagon and the dipstick tube has a tab that holds it to the fan housing. If it is properly bent and secured the pressure holds it down so the oring is sealed.
Image

does it look like mine is missing this tab, or is it on the underside of the tube?
1979 California Transporter

User avatar
SlowLane
IAC Addict!
Location: Livermore, CA
Status: Offline

Post by SlowLane » Thu Feb 19, 2009 8:59 pm

For the dipstick, I used a long stretchy spring to keep the dipstick "head" socketed firmly in the tube. It's just a minor hassle to unhook the spring when I check the oil.

User avatar
Gypsie
rusty aircooled mekanich
Location: Treadin' Lightly under the Clear Blue!
Status: Offline

Post by Gypsie » Fri Feb 20, 2009 1:20 am

it's a coupla 2 to 3 inches back from the end of the tube, perpendicular like, with a hole. Look at where the tube passes by the fan housing, and look at the tube in the approximate location. Are there spot weld marks?

Image
Image

Image

I bet you could use a small hose clamp in that location, bend the "overage" and drill a hole to accept the bolt to hold it until you could find a replacement dip stick tube. Or get real homeschooled and make a replacement tab and weld it (or have it welded) on.
So it all started when I wanted to get better gas mileage....

User avatar
airkooledchris
IAC Addict!
Location: Eureka, California
Contact:
Status: Offline

Post by airkooledchris » Sat Feb 21, 2009 6:37 pm

ok, nearly the end of day one on this project.
so far so good.

Image

hardest part so far was getting the trans far enough forward to clear the lower case/trans bolts. id push it all the way forward until it hit the crossmember and it still wouldn't clear them. I had to basically just keep lowering the motor down then the trans down bit by bit until they were both angled far enough down to slide forward and clear of everything.

stupid CV's kept getting in the way despite my hanging them with wire.
note, get them as high up into the compartment as possible or they will still cause you grief.

and for the rest of the pics/progress....

motor mount:
Image

Image
Image
Image
Image


and the one thing that just kept getting in the way. the stupid tailpipe for the BA6:
Image

no, it doesn't come off. I had to drill out and extract the screw that was seemingly holding it in place, but its part of the BA6 now and I made do with it still there. (despite my trying to kill it)

only one part that I wish I had right now, but I could do anytime even with the trans back in is this little boot thingy:
Image
1979 California Transporter

User avatar
airkooledchris
IAC Addict!
Location: Eureka, California
Contact:
Status: Offline

Post by airkooledchris » Sat Feb 21, 2009 9:48 pm

it was dark but I wanted to take just a few more parts off to get ready for tomorrow morning...

here's the clutch, which to me looks good:
Image


pressure plate:
Image

flywheel:
Image

backside of flywheel:
Image

the business end:
Image


and possible cause for mail seal leak - it looks like that nasty thick sludgy case sealant leaked down into the main seal, perhaps that caused a leak:
Image

the seal looks like its in great shape, so maybe this isn't even where the nasty mess is coming from:


Image

are these the 'oil galley plugs' people refer to? if so it looks like they were already switched for the 'screw in type' :
Image


this fluid doesn't smell like anything at all, and I know some have said that trans fluid has a specific stink to it. its really thick, but I run SAE40 which is thick and black so I could never really tell if it was from the motor or trans. im starting to lean towards it being this tranny input shaft seal as the cause of the seepage:
Image
1979 California Transporter

User avatar
Amskeptic
IAC "Help Desk"
IAC "Help Desk"
Status: Offline

Post by Amskeptic » Sat Feb 21, 2009 10:49 pm

That all looks nasty. The flywheel looks contaminated with heat marks, the pressure plate does too. They will need to be thoroughlly sanded in a cross-hatch both directions, GumOut spray rinse in between. Clean clean clean and dry. The clutch disk should be absolutely dry, does it have a greasy sheen? The case sealant drip is not responsible for the oil leak. Check very closely the suppleness of the main seal. That does not look like a transaxle input shaft seal leak, if the lake in the bottom of the bell housing does not smell like transaxle fluid, it is engine oil. Check the gallery plugs carefully and the camshaft plug too. What is your endplay?
ColinQuestionAMinute
BobD - 78 Bus . . . 112,730 miles
Chloe - 70 bus . . . 217,593 miles
Naranja - 77 Westy . . . 142,970 miles
Pluck - 1973 Squareback . . . . . . 55,600 miles
Alexus - 91 Lexus LS400 . . . 96,675 miles

vdubyah73
IAC Addict!
Status: Offline

Post by vdubyah73 » Sun Feb 22, 2009 5:59 am

Gear oil smells like dead dinosaurs. It is unmistakable.
1/20/2013 end of an error
never owned a gun. have fired a few.

User avatar
airkooledchris
IAC Addict!
Location: Eureka, California
Contact:
Status: Offline

Post by airkooledchris » Sun Feb 22, 2009 1:44 pm

your right, that isn't gear oil.
I removed the 17mm fill plug on the trans and checked, its just a hair below the edge of the hole. doesn't appear any is missing.

also, it smells WAY different from engine oil.

sooooo, its engine oil that is leaking.
the question remains, from where and what to do to stop it?

I am not currently setup with the tools or knowledge to check my endplay unfortunately. ill read up on it and see if I can get that number.

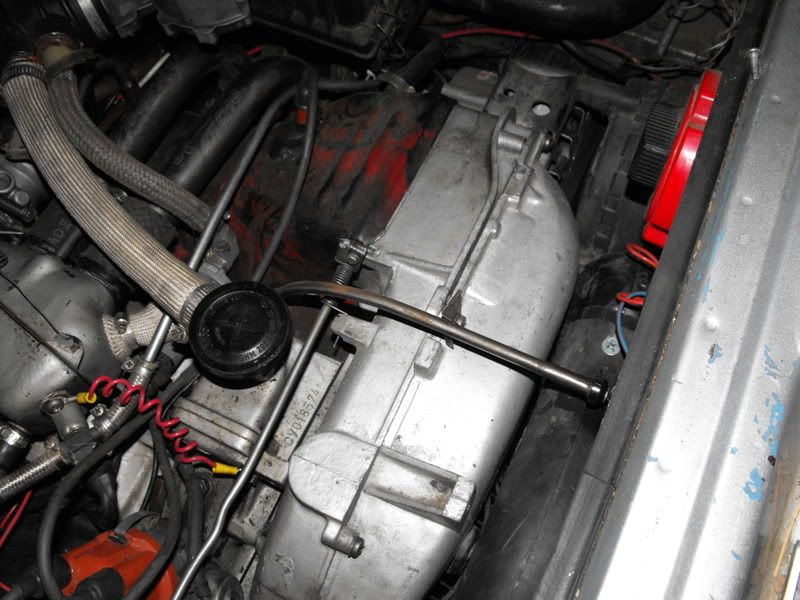
I tried to clean things up a bit to see if it would give a better idea of where the oil is coming from.

these 'galley plugs' if that is what they are called, DO look dirty, but it looks like some kind of sealant that is just gummed up around them. they don't seem to show any specific signs of leaking (that I can tell, having no experience looking for an oil leak prior to now)

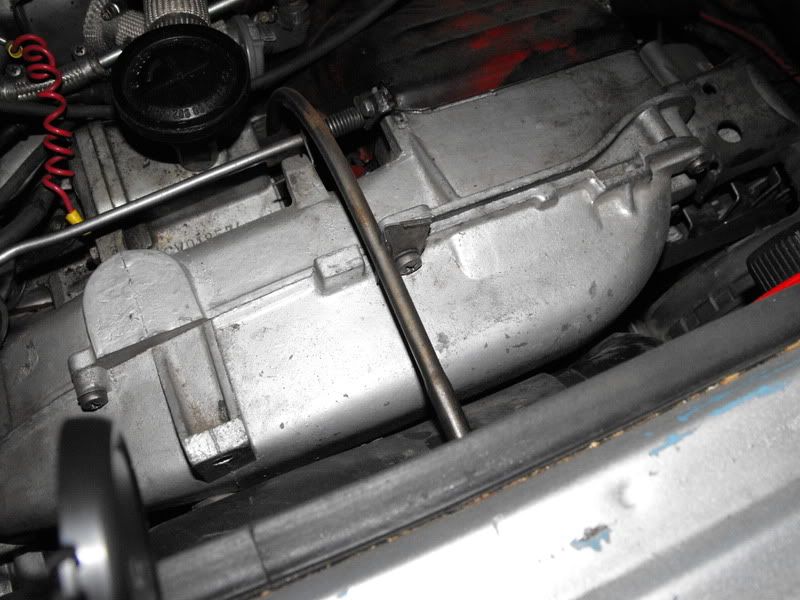
the 'cam plug?' also seems to just be covered in that thick black sealant, and not specifically leaking oil that I can tell:
Image

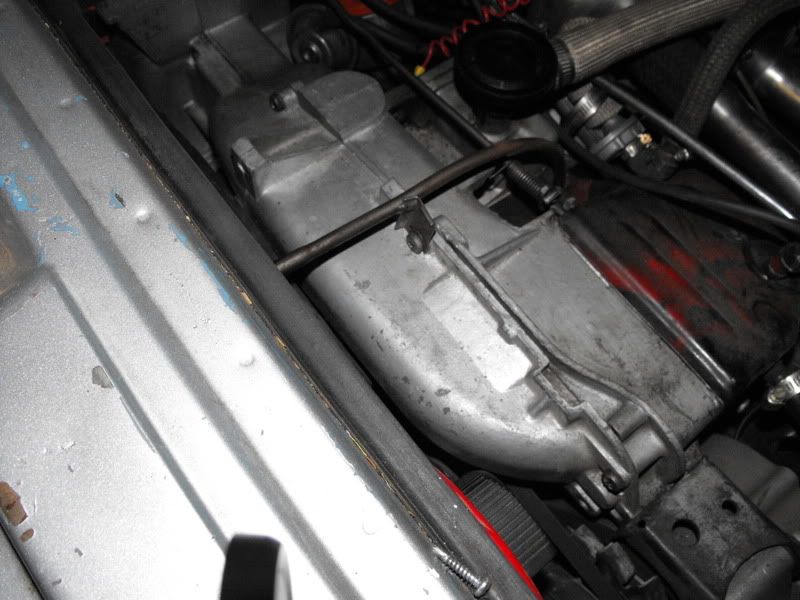
the rear main seal also looks to be in perfect condition. Im not sure what I should be looking for exactly, but I don't see any cracks or tears or signs of it being misshapen or deformed in any ways. as mentioned before there was some of that sealant dripping down over that very top part of it, but that's it.

Image

when you reference 'heat marks' - is this them? those sorta red/blueish colored area's?
Image

Image

the clutch disc seems dry as a bone, the only residue I could find on it is a darkish colored dust:
Image


so, go get the flywheel and clutch disc resurfaced, and then just swap out the main seal, flywheel o-ring (and wherever that felt washer goes) and slap it together and hope for the best?
I don't see what else I can address with what I currently have taken apart.
1979 California Transporter

User avatar
dingo
IAC Addict!
Location: oregon - calif
Status: Offline

Post by dingo » Sun Feb 22, 2009 3:25 pm

10th pic from the top: what is that 1/4 copper line ?
'71 Kombi, 1600 dp

';78 Tranzporter 2L

" Fill what's empty, empty what's full, and scratch where it itches."

Post Reply