Hydraulic Lifter Adjustment
Posted: Mon May 06, 2013 3:29 pm
Look at Diagram A. You will see two cross hairs, one in the middle of the camshaft, the other in the middle of the rocker shaft. Consider this a critical dimension that is known to change as the engine warms and cools. Now look at the "rock" and the "hard place". The rock is the contact between the lifter and the base circle of the cam lobe, the hard place is the valve seat. We must have space in the valve train for the valve to be firmly shut when it it is supposed to be shut. That "space" is defined by the valve stem, the rocker arm, the push rod, and the lifter as it rides the closed interval of the cam lobe, known as the "base circle".
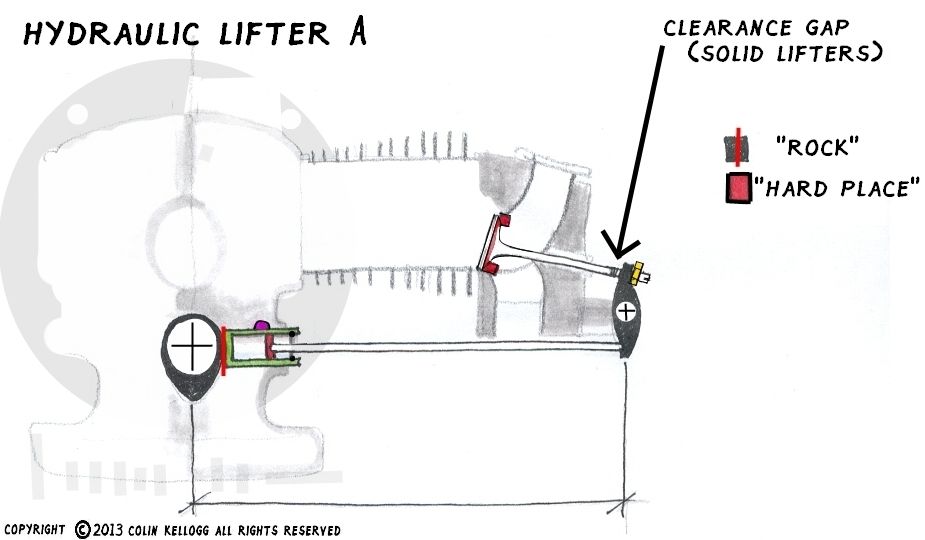
The problem is that the valve stem likes to grow longer as it gets hot. The push rod also grows longer as it gets hot. Now we do not have room for the valve to seat. Even with the lifter shoved against the base circle of the cam lobe, the slightly longer push rod and valve stem will prevent the valve from closing when the engine is hot. Valves will burn out if they do not have sufficient seat time, just like us.
Well? Make an extra space then, that allows a hot valve to always be able to close, you'll get a little cold valve clack, oh well, part of the charm.
For most of our 1500 and 1600 engines, the valve clearance used to be .004" That was the space VW engineers deigned as enough expansion room, but not so much that the engine would peck itself to death. Yes, too much clearance would allow the valve adjustment screw to peck a crater in the valve stem. But guess what? They demanded that you adjust the valves with a stone cold engine. Dealer mechanics were not adjusting engines stone cold. They would start a customer's engine to drive it into their work bay. In that evil few minutes of barely warm combustion chambers, the aluminum under the rocker shaft (cross hair, remember?) would push the rocker arms away from the valves. Dealer mechanic would find "acceptable valve clearances" that were actually too tight if fully cold. VWs had a rash of burned valves. So they allowed the clearances to go up to .006" on the Type 1 engines, and designed the Type 4 engines from the get-go at .006" (plus another .002" for the "super-grow" sodium cooled exhaust valves in the '74 Type 4 engines)
All of this to say, don't get too excited that your valve clearances must be exacto-mundo .006", instant death if not, on your Type 1 engines. They do remember when people adjusted them to .004". . . stone cold. You can go for a snuggish .006" on the intakes and a nice easy slip on the exhausts.
"But this is a hydraulic valve adjustment procedure," you say.
"Know the Whys and Wherefores," reply I.
In 1978, the automatically self-adjusting hydraulic valve lifter was introduced. No more having to adjust your valves, they crowed. We know better. You see the lifter close up in Diagram 2. Instead of a solid lifter, there is now a barrel with a piston inside. You see the spring that pushes the piston out against the push rod to the rocker arm to the valve. No more clacking and pecking mile after mile, that spring quiets things down as it keeps everything in contact no matter the temperatures. But, we have to have a way to make the piston and barrel act like a solid lifter when that cam lobe comes around to open the valve. See the purple half moon perched on top of the lifter? That is actually an oil supply gallery drilled in the case that feeds each lifter with oil that fills the chamber where the spring lives. Every time the barrel gets hammered by a cam lobe, the increase in pressure presses shut a little ball at the piston where oil normally is allowed to travel up the push rod to the rockers and valves. Then, when the lobe has passed, that ball releases from the outlet hole, and oil is allowed to leave, but as importantly, the piston is allowed to adjust its position in the barrel depending on how the valve stem and the push rod and the aluminum is all expanding or contracting. Very incremential, this repositioning every time the cam lobe passes and releases the little ball from the outlet hole.

All we do, when we "adjust" our valves with hydraulic lifters, is to reset the position of the piston to midway in the barrel. That is all. Unlike anything you have read elsewhere, we do not care if the lifter is "pumped up" or not. It does not matter, it does not matter. It does not matter. If we are setting the position of the piston in the barrel, we want the piston to be able to move in the barrel, don't we? Of course we do. Either 1 1/2 or 2 turns will be fine. I switch from 1 1/2 to 2 and back to 1 1/2 every 50,000 miles just to let the piston have a new spot to wear in the barrel. So far, I am at 110,100 miles with flawlessly performing original hydraulic lifters (07/04/16).
Move the crankshaft to line up the TDC mark with the "0" on the scale. Ask the distributor if you are on cylinder 1 or 3. Start on whatever cylinder it tells you to, we don't care. Each subsequent cylinder will require moving the pulley 180* (*counterclockwise if you are going backwards up the cylinder numbers 1-2-3-4, clockwise if you are going in normal operating direction, clockwise through the firing order 1-4-3-2 etc).
Look at Diagram B. We have made each adjusting screw a clock. READ THE INITIAL POSITION. Is it 9-3? 12-6? 10-4? 8-2, like in the picture?
If this is your first adjustment on this engine, there are no forensic clues to be had. We do not know how the valves were set last time, right? But at the next valve adjustment, you will have valuable clues about how your engine is feeling . . . IF you promise to adjust with precision now! If you do not know this engine, recheck at a couple of thousand miles just for a heads-up.
Read the initial position? Good. Loosen the locknut. Do not strip the edges of the locknut. The screw may back out with the nut, we don't care. You already read the initial position. Back the screw out 1 1/2 turns if that is what you adjusted them to last time, 2 turns if that is what you adjusted them to last time. It should read the same position on the clock as your starting point. By turning the screw out, we are allowing the piston to get pushed up the barrel until it hits the circlip-that-keeps-it-all-assembled. Then, any turning of the screw opens up clearance between the valve stem and adjusting screw. We are on a quest to find the perfect no-clearance "0" point where the piston is against the circlip. Grab the rocker arm at the locknut/adjusting screw, and do a little push-pull test. Do you get an easy clacka-clack? If so, you have wear in the valve train, most usually at the lifter heel in green here in Diagram C.

You must now *subtract* from your reading as you turn the screw back in with your fingers (towards tight) until you just feel the screw touch the valve stem and the clacka-clack goes away. In this example, the new touch point (the "0" point) is at 10:30-4:30. Since it was initially at 2-8, we say you "gained 2 and a half hours" since your last valve adjustment. Now turn in exactly 1 and 1/2 turns (or 2) from your new "0" point. You will feel the spring compress. It will take more effort than it took to unscrew. Hold the screw while you tighten the locknut to "snug" not "chimpanzee cuckoo crazy."
Let's say that you turned out the requisite 1 1/2 turns (or 2 turns if that is where you set them last time) and there is no easy clack. Take another exact half turn. Do you get an easy clack? You better. If not go another half turn exactly. As soon as you get a clearance, you then screw it back in while subtracting from wherever number you had to go out to get a clack. In Diagram D, 1 1/2 turns back did not get clearance, so I went another half turn to 2 total(still showing 2-8 position). Got the clearance, and began turning back in clockwise from 2 full turns until the screw touched the valve stem at 12-6. In this example, I "lost two hours". Some people find that they have lost six hours, even twelve. That would be bad news, but sometimes it is just that you lost count. Make a note of evidence of creeping valve seat recession on this particular cylinder. This new "0" point is where I then turn exactly 1 1/2 turns in to 12-6, secure the locknut and on to the next valve.
If you have seen many many engines, you have seen many many cases of one valve adjusting screw sticking out from the locknut by three or four more threads than the others. Well? That means that many many engines have lost many many "hours" between adjustments, days even (two full turns of a clock is a day), out further than the others. You have time to monitor, time to correct whatever is causing this change, time to plan an impending teardown.
Generally, three adjustments in a row that lose or gain more than three hours each time, is a trend. By the time you have drilled a screw one full turn in or out just to maintain your 1 1/2 (or 2) preload, you know something is up. Plan investigative surgery at the end of your light summer travel schedule, but monitor!
If you have wear, change the oil and filter, clean the strainer like CSI Mami, look for magnetically reactive grey paste or lifter bottom shards, see if your pushrods are pushing oil up to the rockers, they should make the entire rocker area wet with splash after only a few minutes of operation. Clean the insides of your push rods with carb cleaner and compressed air if you can, to see if this improves the oiling up to your rocker arms. Clean them too. They have small passages inside of the pushrod cups that go to the rocker shaft and out to the adjusting screws. Clean is Good. Lifters can and have been replaced on the fly. PM me if you find yourself in this predicament.
If you have valve recession, pull the plug for that cylinder and compare it to others. Is it bleached more white? Lean! Injector seal, intake manifold gasket, intake runner sleeve leak? Exhaust copper ring or flange gasket leak? If everybody looks lean and bleached white, get that mixture richened up, and start paying attention to your driving habits and ambient temperatures. Strangely enough, the intakes like to recede and they do not live in hot hellsville. It could be that your seats are not surrounded by enough metal to stay in place under normal hot operating circumstances. I personally have never had a recessed seat in thirty four years of seriously hot highway driving with factory stock heads.
Noisy Lifters
This is where some sites get all excited and give bad advice.
Noisy lifters which have not pumped up make a fiercesome and distressing racket. Expect it after a winter's sit. Expect it if you have a tired engine that has sat a week. Expect it occasionally with your daily driver that just happened to sit on an open valve with a lifter ball that wasn't quite seated. These other sites may suggest running the engine with no preload on the lifters. One of them suggests running the engine with .006" for a couple of days to help the balky lifter(s) pump up. Please do not ever do that. The hammering that occurs between the piston (red) and the circlip (little black circles) often dislodges the circlip and disassembles the lifters inside of the engine. The rule for noisy lifters is:
Adjust the preload as above (add a half turn or subtract a half turn from whichever your current preload is).
Ensure clean oil and clean filter and correct level.
Gently go drive at modest rpms until the engine gets warmed up, then get on the highway and drive 55 for 30 minutes. I have yet to run across a hydraulic lifter that has not pumped up. Again, PM me if you have an engine that has a lifter that does not quiet down. I'd like to stretch my experience of these lifters being soooo perfectly reliable that I cannot report a single failure-to-pump-up, except for three disassembled lifters with loose circlips from . . . bad advice to run them with .006" clearance.
NO COMPRESSION!
I have happened across a couple of people who diligently adjusted their lifters to 1 1/2 or 2 turns preload and their engines would not start after. "Sounds like it has no compression, the engine just whirs on the starter." That is because they had no compression. You can be sure that they had one of three possible errors:
1) They were sawing so powerfully on the screw/locknut trying to find the clacka-clack point, that they were actually compressing the spring inside the lifter, and their "0" point was actually with the piston bottomed out in the lifter.
2)the spring inside the lifter was broken (often from running the engine for a couple of days at .006" clearance trying to pump up the lifter, nooooo)
3) the lifter is pumped up and refusing to bleed down at all, which it is supposed to do when there is no opening pressure from a cam lobe on it.
Solution 1)
Settle down and get gentle. Sure, try to verify that the spring compresses and pushes back. But turn the screw out until you are at a no-pressure-no-springiness clack. Use your fingers to delicately find the "0" point.
Solution 2)
Check your questionable valve's mate. Observe the orientation of the rocker arm and screw thread depth on its mate. If your problem child is angled back, if the screw is threaded in deeper, that was your effort to turn in it in past "0". Back it out until it is definitely not touching the valve. Now see if you can push the bottom of the rocker arm in towards the lifter. It will be springy and push back if the spring is springing. If it is dead AND the rocker arm is angled as though it is closer to the camshaft, assume a collapsed lifter. You can gingerly try to run the engine by turning in the screw to bottom the dead lifter, adjust to .006" from dead bottom.
Solution 3) This is a PIA, and I have happened across two sets of new lifters that were so stupid they didn't know how to bleed down. Release the locknut. Back out the screw you had just adjusted 1 1/2 (or 2) turns and observe if it is actually the valve retainer coming back out at you. That is proof of a valve that was stuck open because the lifter would not release the oil inside as you were trying to adjust it earlier.
Sad to say, I had to pull all the lifters, release the check balls with a small allen wrench down the middle of the lifter, and readjust. If anyone has had this problem, I'd like to hear from you. PM me.
Colin
The problem is that the valve stem likes to grow longer as it gets hot. The push rod also grows longer as it gets hot. Now we do not have room for the valve to seat. Even with the lifter shoved against the base circle of the cam lobe, the slightly longer push rod and valve stem will prevent the valve from closing when the engine is hot. Valves will burn out if they do not have sufficient seat time, just like us.
Well? Make an extra space then, that allows a hot valve to always be able to close, you'll get a little cold valve clack, oh well, part of the charm.
For most of our 1500 and 1600 engines, the valve clearance used to be .004" That was the space VW engineers deigned as enough expansion room, but not so much that the engine would peck itself to death. Yes, too much clearance would allow the valve adjustment screw to peck a crater in the valve stem. But guess what? They demanded that you adjust the valves with a stone cold engine. Dealer mechanics were not adjusting engines stone cold. They would start a customer's engine to drive it into their work bay. In that evil few minutes of barely warm combustion chambers, the aluminum under the rocker shaft (cross hair, remember?) would push the rocker arms away from the valves. Dealer mechanic would find "acceptable valve clearances" that were actually too tight if fully cold. VWs had a rash of burned valves. So they allowed the clearances to go up to .006" on the Type 1 engines, and designed the Type 4 engines from the get-go at .006" (plus another .002" for the "super-grow" sodium cooled exhaust valves in the '74 Type 4 engines)
All of this to say, don't get too excited that your valve clearances must be exacto-mundo .006", instant death if not, on your Type 1 engines. They do remember when people adjusted them to .004". . . stone cold. You can go for a snuggish .006" on the intakes and a nice easy slip on the exhausts.
"But this is a hydraulic valve adjustment procedure," you say.
"Know the Whys and Wherefores," reply I.
In 1978, the automatically self-adjusting hydraulic valve lifter was introduced. No more having to adjust your valves, they crowed. We know better. You see the lifter close up in Diagram 2. Instead of a solid lifter, there is now a barrel with a piston inside. You see the spring that pushes the piston out against the push rod to the rocker arm to the valve. No more clacking and pecking mile after mile, that spring quiets things down as it keeps everything in contact no matter the temperatures. But, we have to have a way to make the piston and barrel act like a solid lifter when that cam lobe comes around to open the valve. See the purple half moon perched on top of the lifter? That is actually an oil supply gallery drilled in the case that feeds each lifter with oil that fills the chamber where the spring lives. Every time the barrel gets hammered by a cam lobe, the increase in pressure presses shut a little ball at the piston where oil normally is allowed to travel up the push rod to the rockers and valves. Then, when the lobe has passed, that ball releases from the outlet hole, and oil is allowed to leave, but as importantly, the piston is allowed to adjust its position in the barrel depending on how the valve stem and the push rod and the aluminum is all expanding or contracting. Very incremential, this repositioning every time the cam lobe passes and releases the little ball from the outlet hole.
All we do, when we "adjust" our valves with hydraulic lifters, is to reset the position of the piston to midway in the barrel. That is all. Unlike anything you have read elsewhere, we do not care if the lifter is "pumped up" or not. It does not matter, it does not matter. It does not matter. If we are setting the position of the piston in the barrel, we want the piston to be able to move in the barrel, don't we? Of course we do. Either 1 1/2 or 2 turns will be fine. I switch from 1 1/2 to 2 and back to 1 1/2 every 50,000 miles just to let the piston have a new spot to wear in the barrel. So far, I am at 110,100 miles with flawlessly performing original hydraulic lifters (07/04/16).
Move the crankshaft to line up the TDC mark with the "0" on the scale. Ask the distributor if you are on cylinder 1 or 3. Start on whatever cylinder it tells you to, we don't care. Each subsequent cylinder will require moving the pulley 180* (*counterclockwise if you are going backwards up the cylinder numbers 1-2-3-4, clockwise if you are going in normal operating direction, clockwise through the firing order 1-4-3-2 etc).
Look at Diagram B. We have made each adjusting screw a clock. READ THE INITIAL POSITION. Is it 9-3? 12-6? 10-4? 8-2, like in the picture?
If this is your first adjustment on this engine, there are no forensic clues to be had. We do not know how the valves were set last time, right? But at the next valve adjustment, you will have valuable clues about how your engine is feeling . . . IF you promise to adjust with precision now! If you do not know this engine, recheck at a couple of thousand miles just for a heads-up.
Read the initial position? Good. Loosen the locknut. Do not strip the edges of the locknut. The screw may back out with the nut, we don't care. You already read the initial position. Back the screw out 1 1/2 turns if that is what you adjusted them to last time, 2 turns if that is what you adjusted them to last time. It should read the same position on the clock as your starting point. By turning the screw out, we are allowing the piston to get pushed up the barrel until it hits the circlip-that-keeps-it-all-assembled. Then, any turning of the screw opens up clearance between the valve stem and adjusting screw. We are on a quest to find the perfect no-clearance "0" point where the piston is against the circlip. Grab the rocker arm at the locknut/adjusting screw, and do a little push-pull test. Do you get an easy clacka-clack? If so, you have wear in the valve train, most usually at the lifter heel in green here in Diagram C.
You must now *subtract* from your reading as you turn the screw back in with your fingers (towards tight) until you just feel the screw touch the valve stem and the clacka-clack goes away. In this example, the new touch point (the "0" point) is at 10:30-4:30. Since it was initially at 2-8, we say you "gained 2 and a half hours" since your last valve adjustment. Now turn in exactly 1 and 1/2 turns (or 2) from your new "0" point. You will feel the spring compress. It will take more effort than it took to unscrew. Hold the screw while you tighten the locknut to "snug" not "chimpanzee cuckoo crazy."
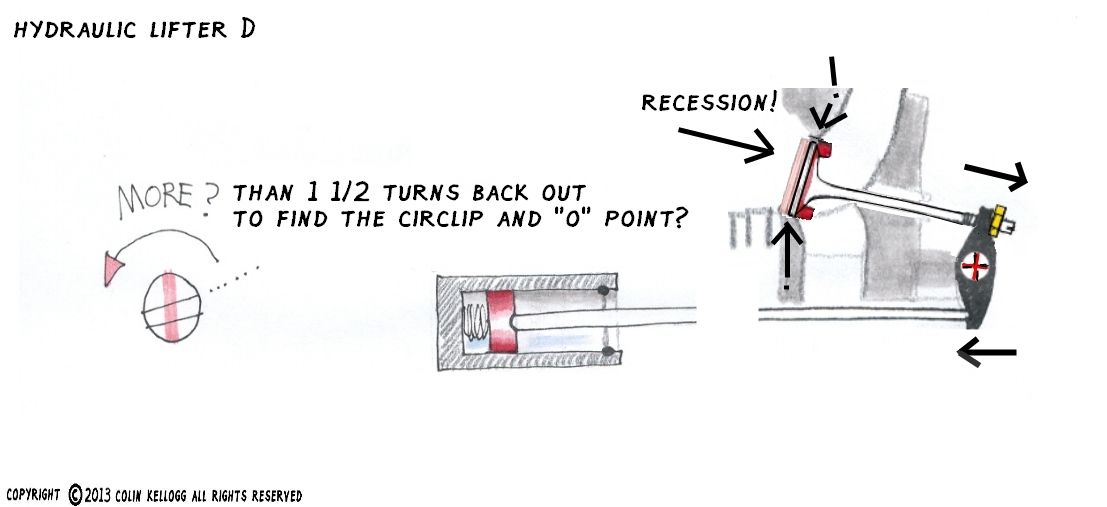
Let's say that you turned out the requisite 1 1/2 turns (or 2 turns if that is where you set them last time) and there is no easy clack. Take another exact half turn. Do you get an easy clack? You better. If not go another half turn exactly. As soon as you get a clearance, you then screw it back in while subtracting from wherever number you had to go out to get a clack. In Diagram D, 1 1/2 turns back did not get clearance, so I went another half turn to 2 total(still showing 2-8 position). Got the clearance, and began turning back in clockwise from 2 full turns until the screw touched the valve stem at 12-6. In this example, I "lost two hours". Some people find that they have lost six hours, even twelve. That would be bad news, but sometimes it is just that you lost count. Make a note of evidence of creeping valve seat recession on this particular cylinder. This new "0" point is where I then turn exactly 1 1/2 turns in to 12-6, secure the locknut and on to the next valve.
If you have seen many many engines, you have seen many many cases of one valve adjusting screw sticking out from the locknut by three or four more threads than the others. Well? That means that many many engines have lost many many "hours" between adjustments, days even (two full turns of a clock is a day), out further than the others. You have time to monitor, time to correct whatever is causing this change, time to plan an impending teardown.
Generally, three adjustments in a row that lose or gain more than three hours each time, is a trend. By the time you have drilled a screw one full turn in or out just to maintain your 1 1/2 (or 2) preload, you know something is up. Plan investigative surgery at the end of your light summer travel schedule, but monitor!
If you have wear, change the oil and filter, clean the strainer like CSI Mami, look for magnetically reactive grey paste or lifter bottom shards, see if your pushrods are pushing oil up to the rockers, they should make the entire rocker area wet with splash after only a few minutes of operation. Clean the insides of your push rods with carb cleaner and compressed air if you can, to see if this improves the oiling up to your rocker arms. Clean them too. They have small passages inside of the pushrod cups that go to the rocker shaft and out to the adjusting screws. Clean is Good. Lifters can and have been replaced on the fly. PM me if you find yourself in this predicament.
If you have valve recession, pull the plug for that cylinder and compare it to others. Is it bleached more white? Lean! Injector seal, intake manifold gasket, intake runner sleeve leak? Exhaust copper ring or flange gasket leak? If everybody looks lean and bleached white, get that mixture richened up, and start paying attention to your driving habits and ambient temperatures. Strangely enough, the intakes like to recede and they do not live in hot hellsville. It could be that your seats are not surrounded by enough metal to stay in place under normal hot operating circumstances. I personally have never had a recessed seat in thirty four years of seriously hot highway driving with factory stock heads.
Noisy Lifters
This is where some sites get all excited and give bad advice.
Noisy lifters which have not pumped up make a fiercesome and distressing racket. Expect it after a winter's sit. Expect it if you have a tired engine that has sat a week. Expect it occasionally with your daily driver that just happened to sit on an open valve with a lifter ball that wasn't quite seated. These other sites may suggest running the engine with no preload on the lifters. One of them suggests running the engine with .006" for a couple of days to help the balky lifter(s) pump up. Please do not ever do that. The hammering that occurs between the piston (red) and the circlip (little black circles) often dislodges the circlip and disassembles the lifters inside of the engine. The rule for noisy lifters is:
Adjust the preload as above (add a half turn or subtract a half turn from whichever your current preload is).
Ensure clean oil and clean filter and correct level.
Gently go drive at modest rpms until the engine gets warmed up, then get on the highway and drive 55 for 30 minutes. I have yet to run across a hydraulic lifter that has not pumped up. Again, PM me if you have an engine that has a lifter that does not quiet down. I'd like to stretch my experience of these lifters being soooo perfectly reliable that I cannot report a single failure-to-pump-up, except for three disassembled lifters with loose circlips from . . . bad advice to run them with .006" clearance.
NO COMPRESSION!
I have happened across a couple of people who diligently adjusted their lifters to 1 1/2 or 2 turns preload and their engines would not start after. "Sounds like it has no compression, the engine just whirs on the starter." That is because they had no compression. You can be sure that they had one of three possible errors:
1) They were sawing so powerfully on the screw/locknut trying to find the clacka-clack point, that they were actually compressing the spring inside the lifter, and their "0" point was actually with the piston bottomed out in the lifter.
2)the spring inside the lifter was broken (often from running the engine for a couple of days at .006" clearance trying to pump up the lifter, nooooo)
3) the lifter is pumped up and refusing to bleed down at all, which it is supposed to do when there is no opening pressure from a cam lobe on it.
Solution 1)
Settle down and get gentle. Sure, try to verify that the spring compresses and pushes back. But turn the screw out until you are at a no-pressure-no-springiness clack. Use your fingers to delicately find the "0" point.
Solution 2)
Check your questionable valve's mate. Observe the orientation of the rocker arm and screw thread depth on its mate. If your problem child is angled back, if the screw is threaded in deeper, that was your effort to turn in it in past "0". Back it out until it is definitely not touching the valve. Now see if you can push the bottom of the rocker arm in towards the lifter. It will be springy and push back if the spring is springing. If it is dead AND the rocker arm is angled as though it is closer to the camshaft, assume a collapsed lifter. You can gingerly try to run the engine by turning in the screw to bottom the dead lifter, adjust to .006" from dead bottom.
Solution 3) This is a PIA, and I have happened across two sets of new lifters that were so stupid they didn't know how to bleed down. Release the locknut. Back out the screw you had just adjusted 1 1/2 (or 2) turns and observe if it is actually the valve retainer coming back out at you. That is proof of a valve that was stuck open because the lifter would not release the oil inside as you were trying to adjust it earlier.
Sad to say, I had to pull all the lifters, release the check balls with a small allen wrench down the middle of the lifter, and readjust. If anyone has had this problem, I'd like to hear from you. PM me.
Colin