Early Bay Box Dis/ReAssembly
Posted: Thu Nov 01, 2012 2:14 am
Early Bay Bus Worm and Peg Box '68- '72 Disassembly
a) Loosen the clamp bolt that holds the steering coupler flange to the steering shaft. Tap the flange up and it might release. You might need a puller if it is rusted. Under it is the dust cover which you can pull off with your fingers.
b) Clean the outside of the box like you mean it. Especially clean both the splines on the pitman shaft right to the seal and the steering shaft splines. This is to prevent damage to the seals and bushings as you pull the shafts out.
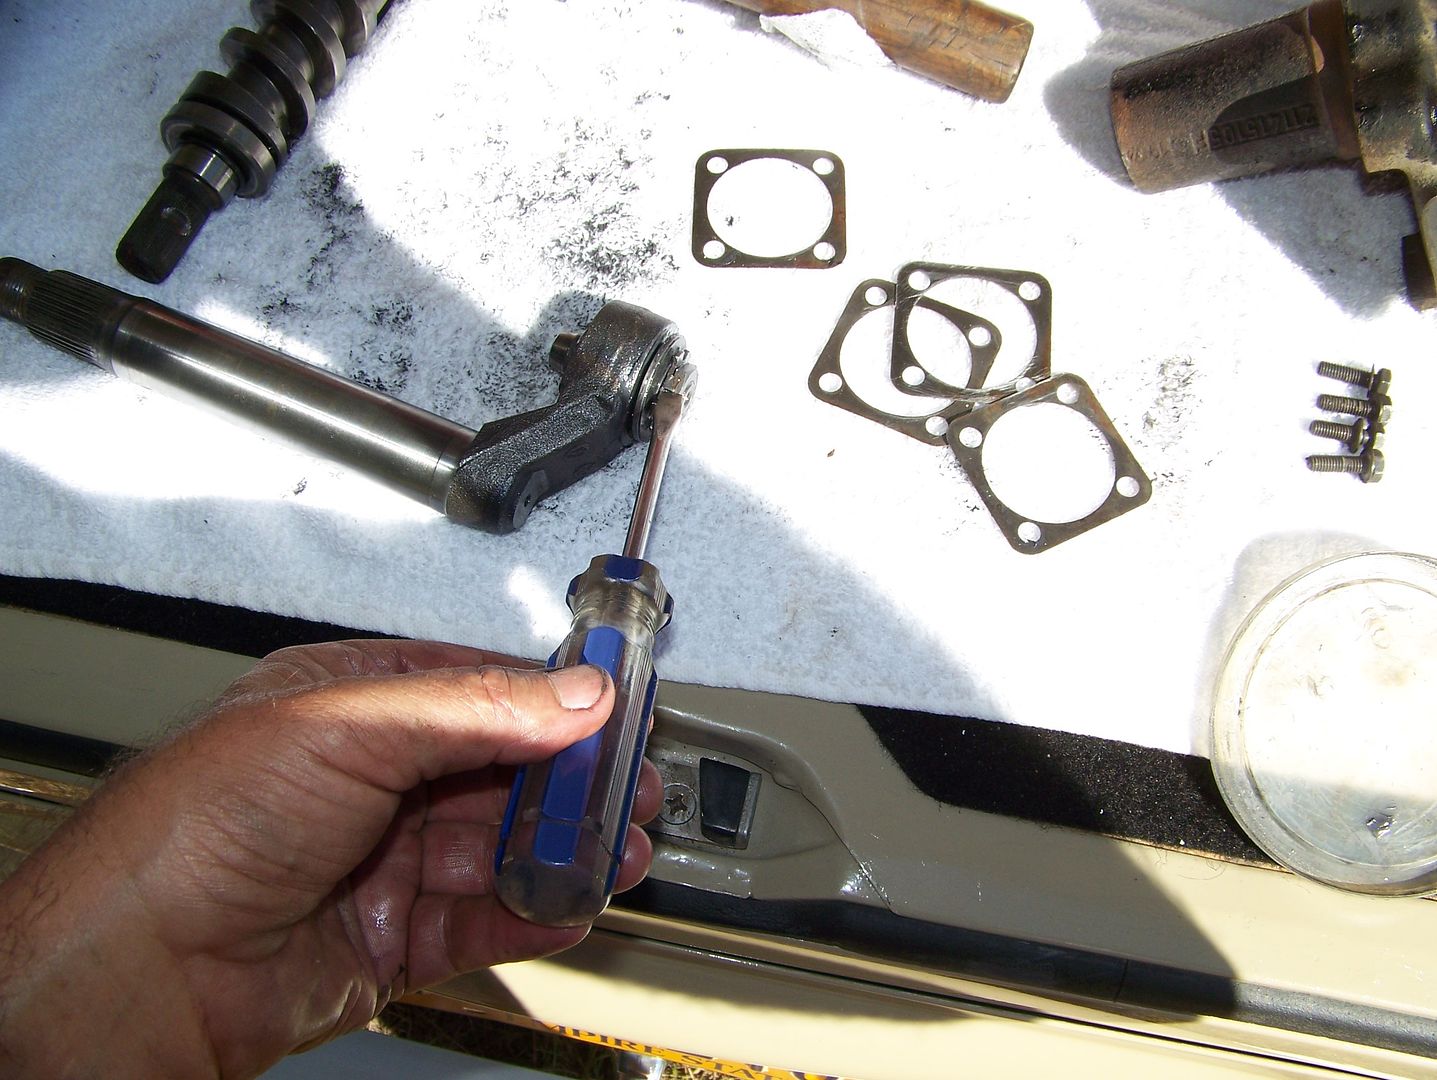
c) Remove the four 13mm side cover bolts that surround the adjustment screw. It will come right off with all of your steering fluid in slippery pursuit.
d) Pull the pitman shaft/peg assembly out where the cover used to be.
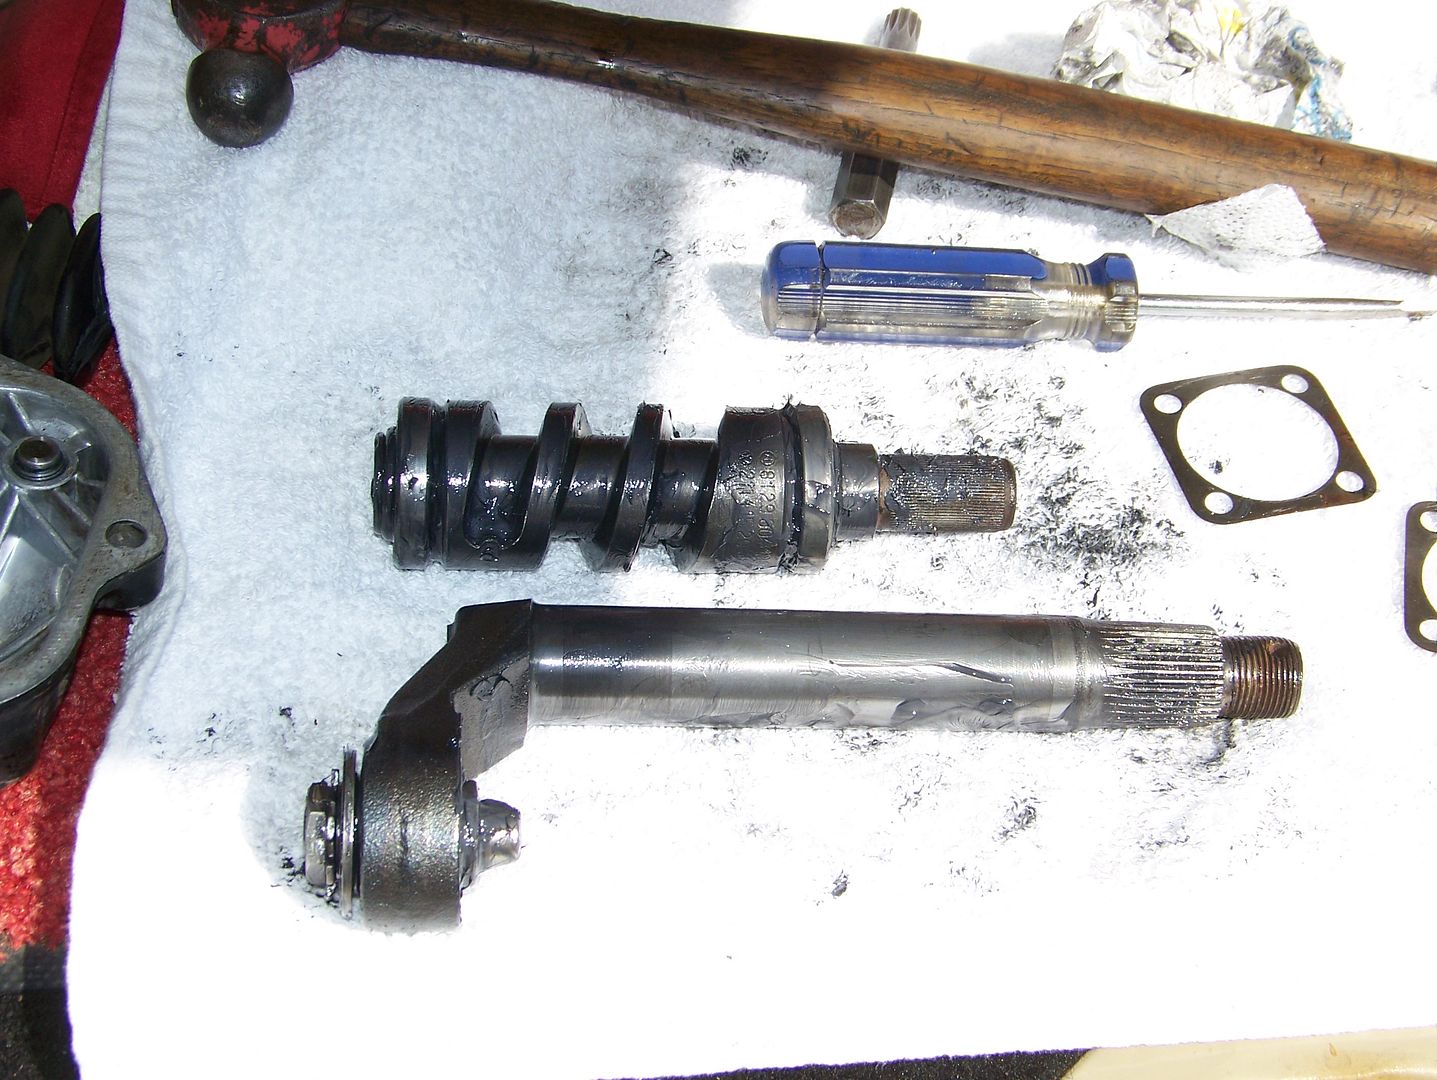
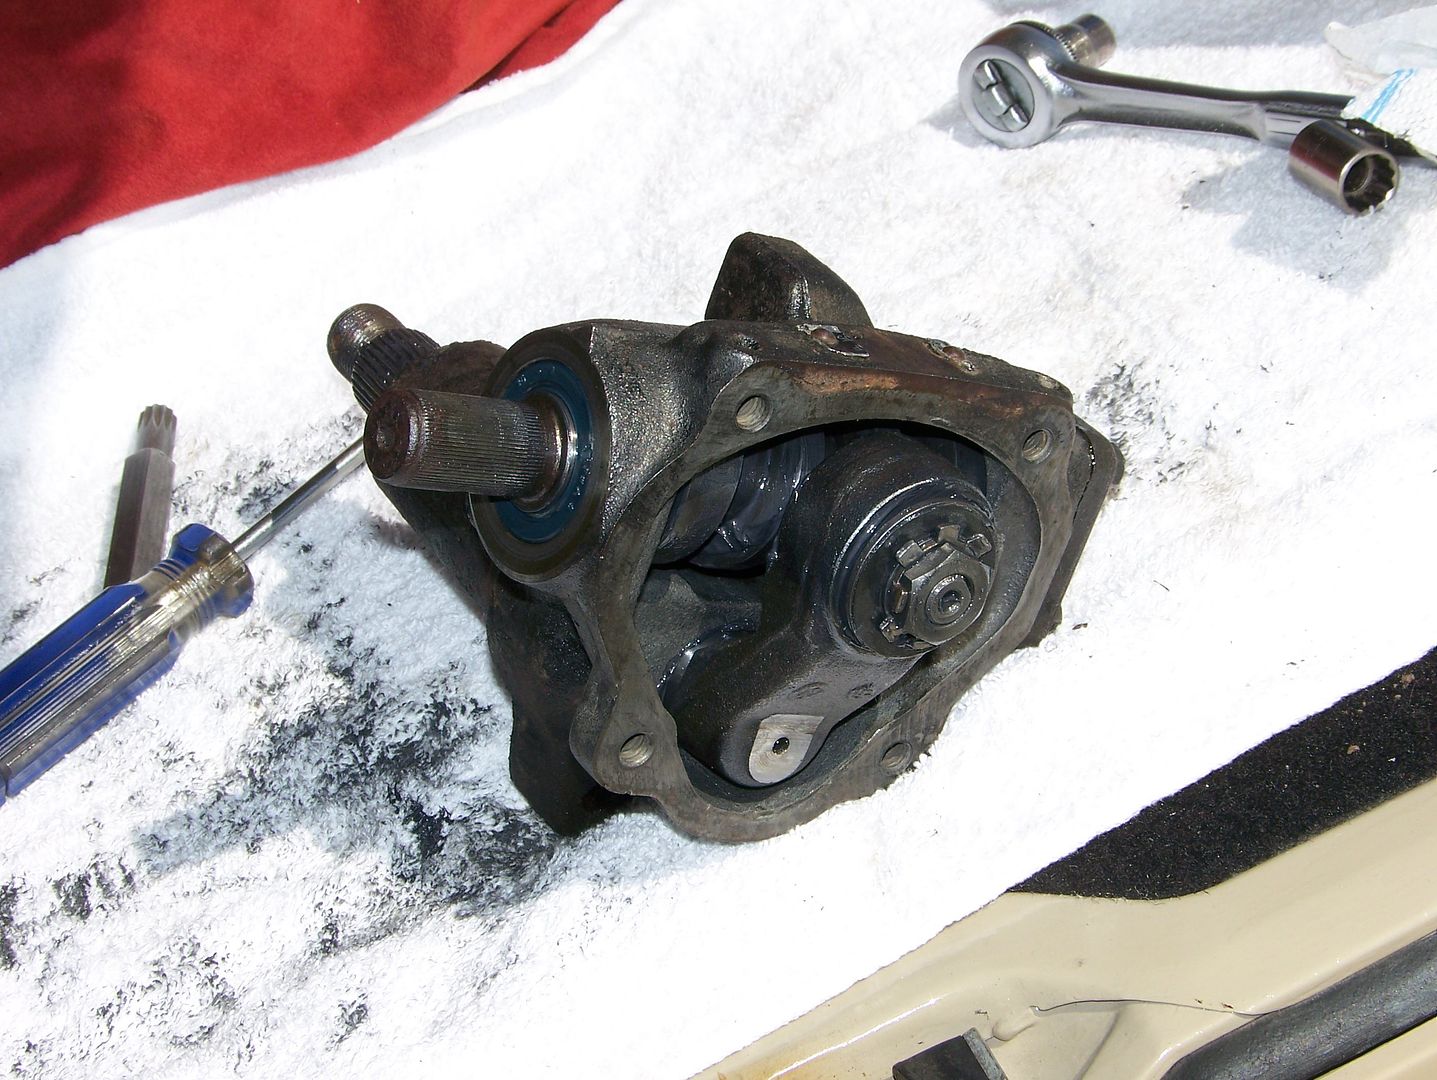
e) Remove the four 10mm end cover bolts. You might need to tap the steering shaft down to help it release. There will an assortment of shims stuck to either the cover or the box. You can press or slide the whole shaft out through the end cover hole.
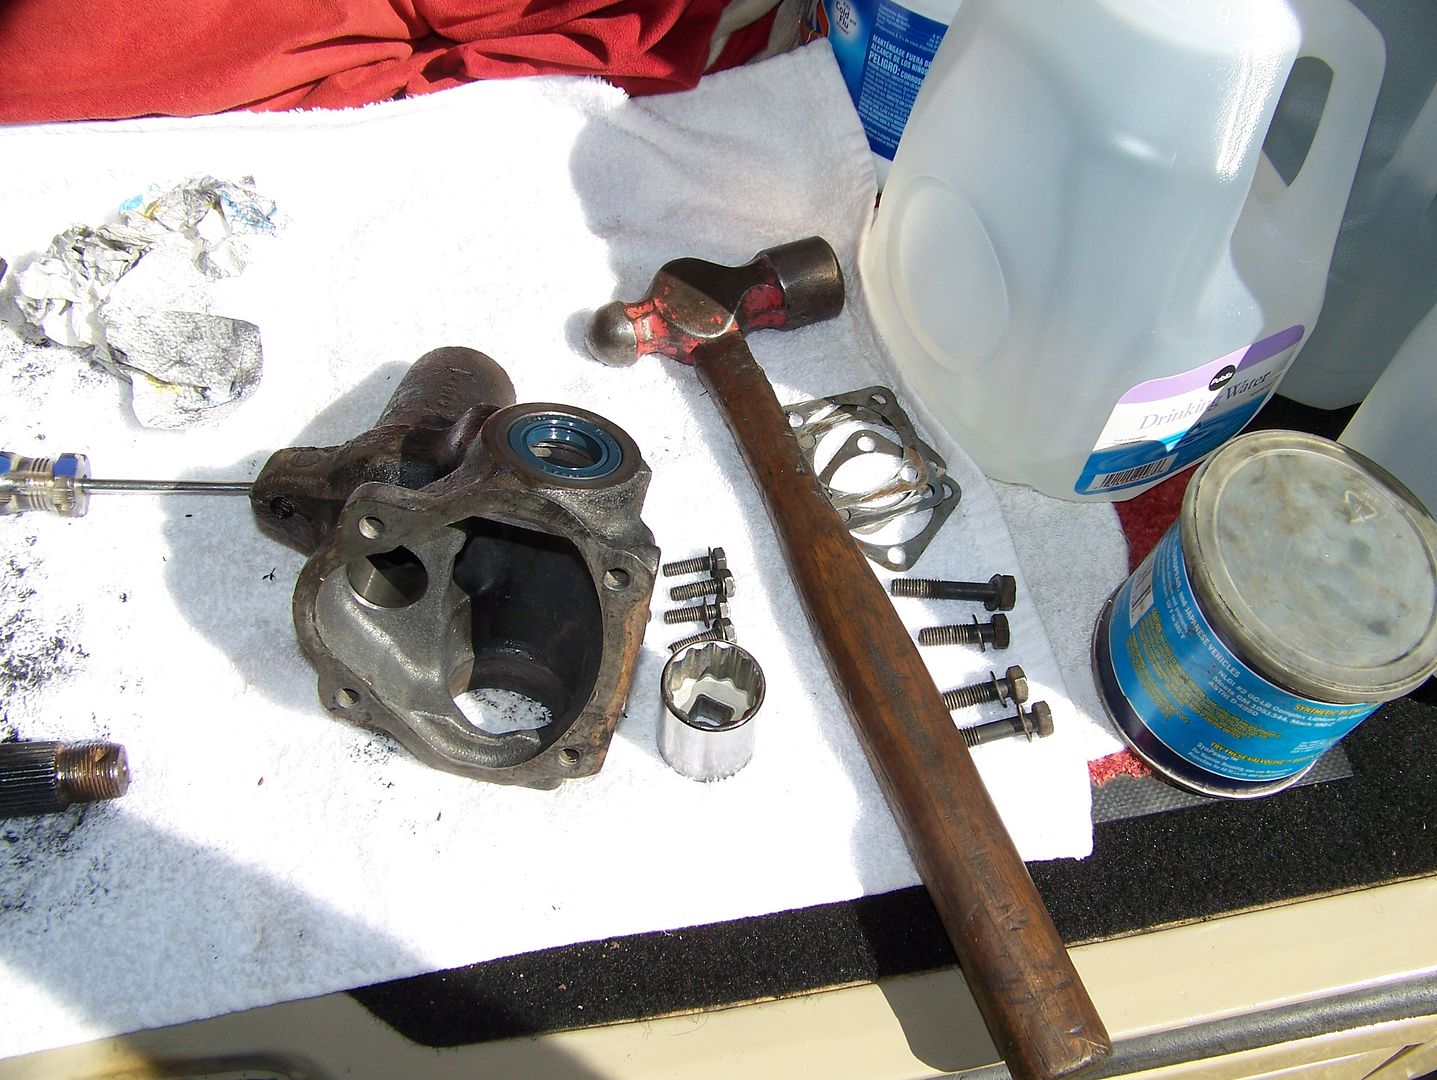
Now your steering box will look just like this:
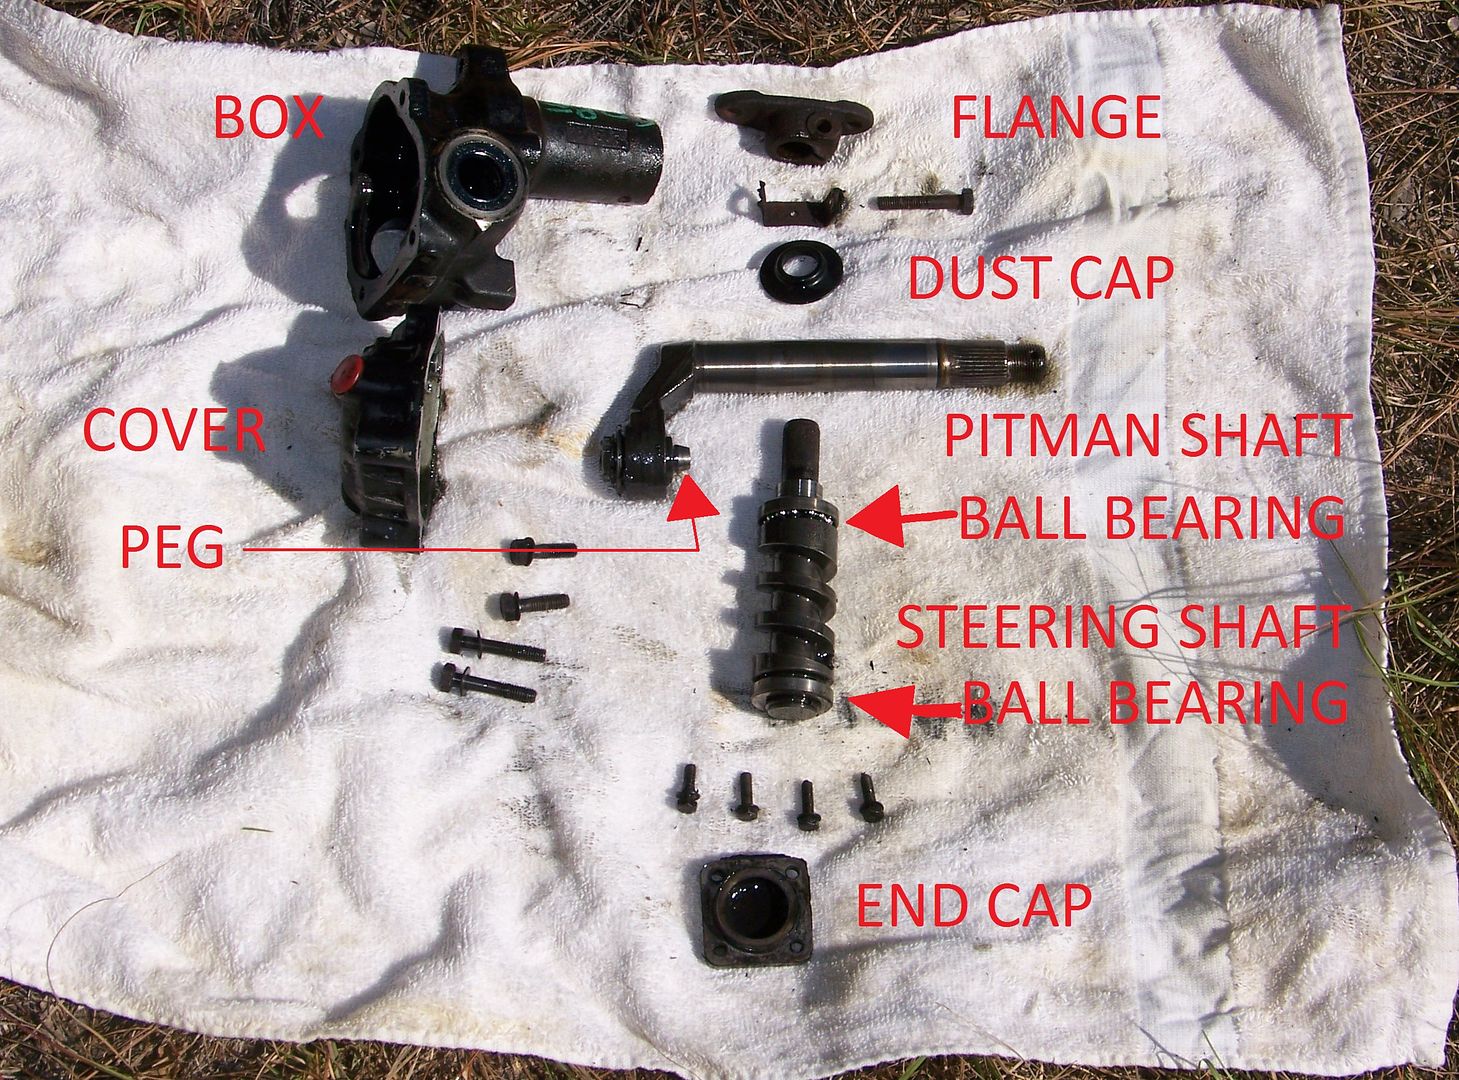
But wait! There's more . . .
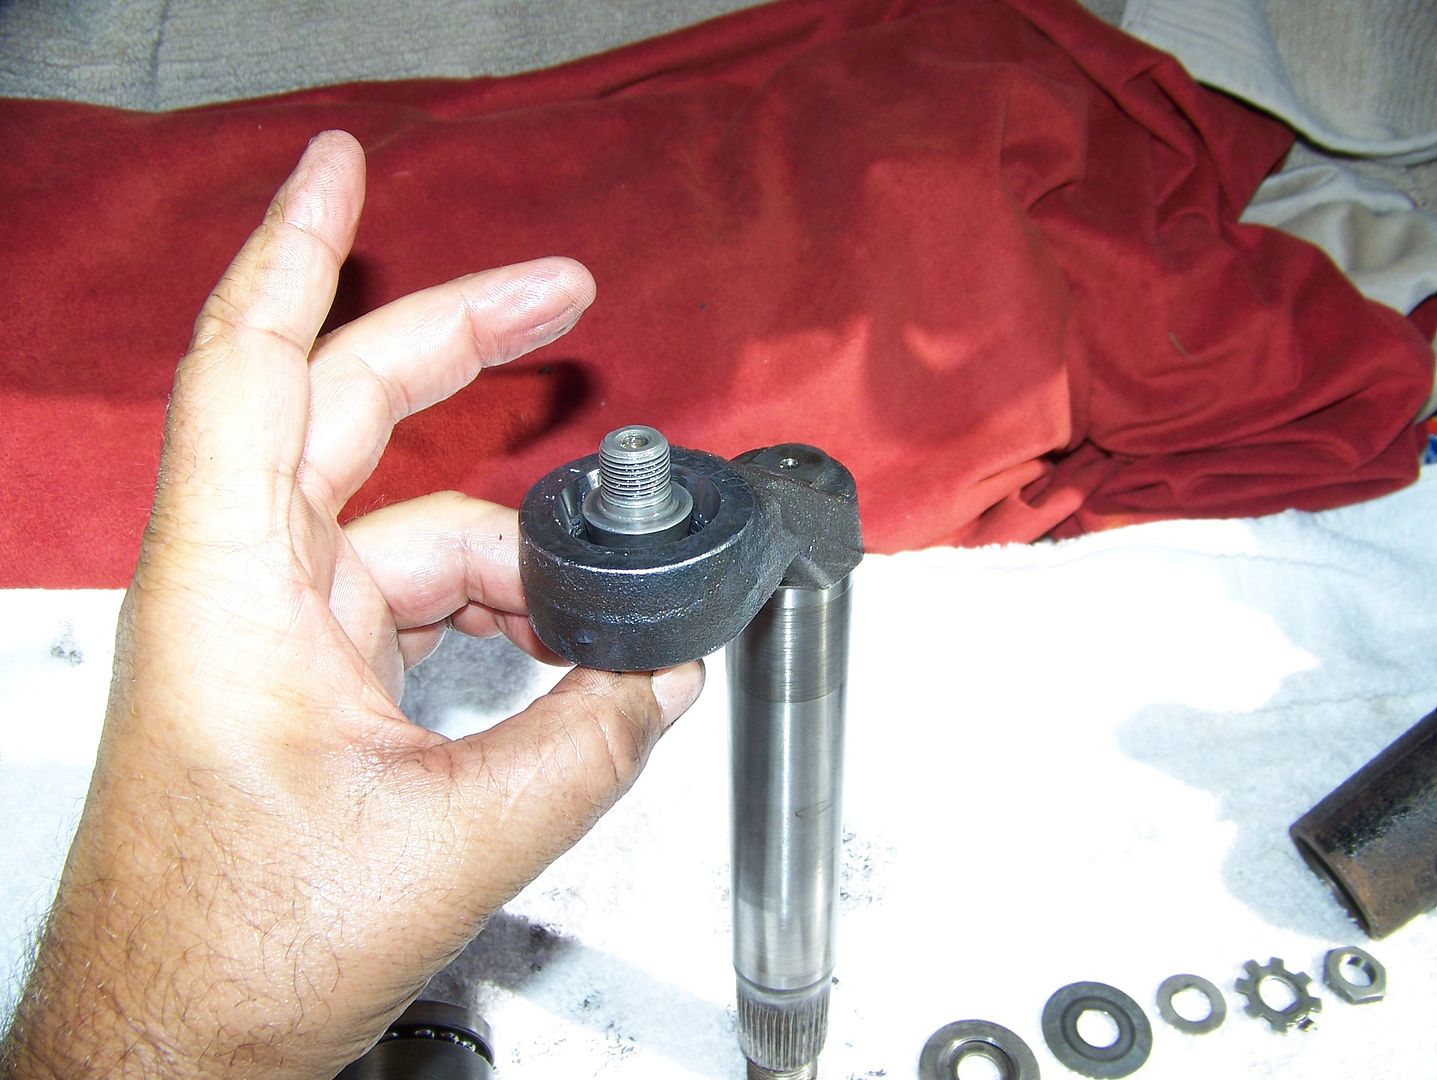
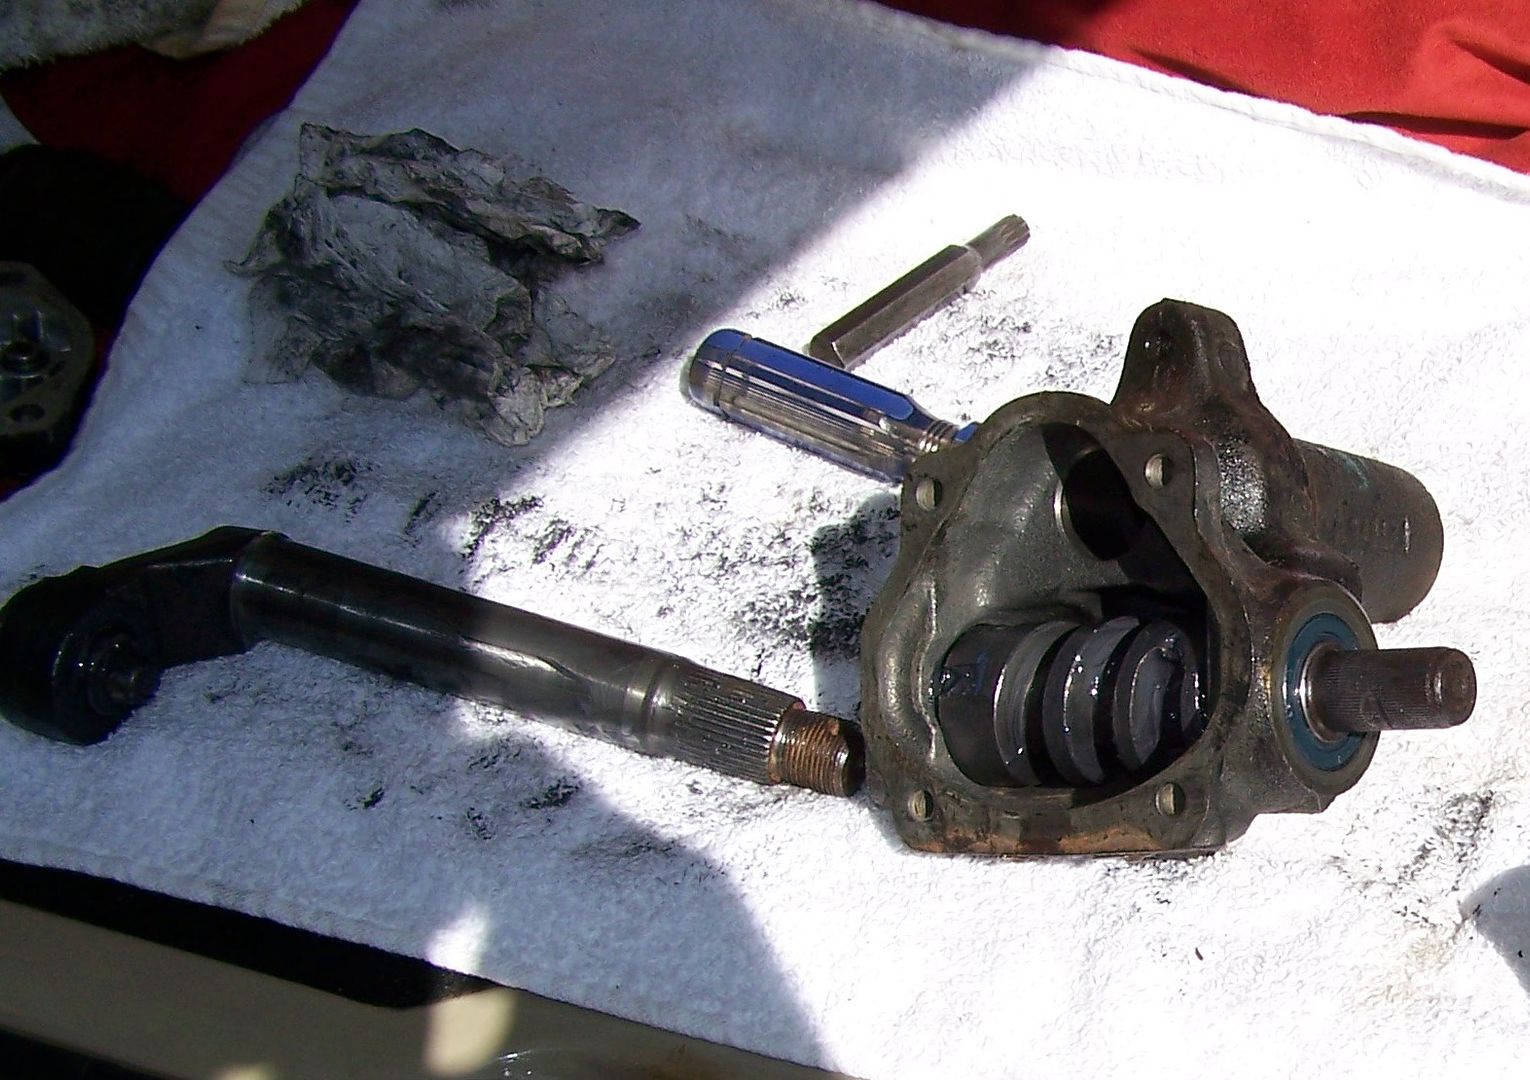
The peg is supposed to rotate inside the pitman shaft's arm. This is critical. When you are hauling on the steering wheel/shaft (worm track), the peg HAS to "walk" up or down the ramp, which it does by rotating along the ramped surface. If the peg is stuck like this one was, it will skid instead, much like a frozen sliding door roller, causing wear on the priceless worm.
I caught this thing right in the nick of time. Here is just the beginning of what might have galled the worm to death at the very center of the track:
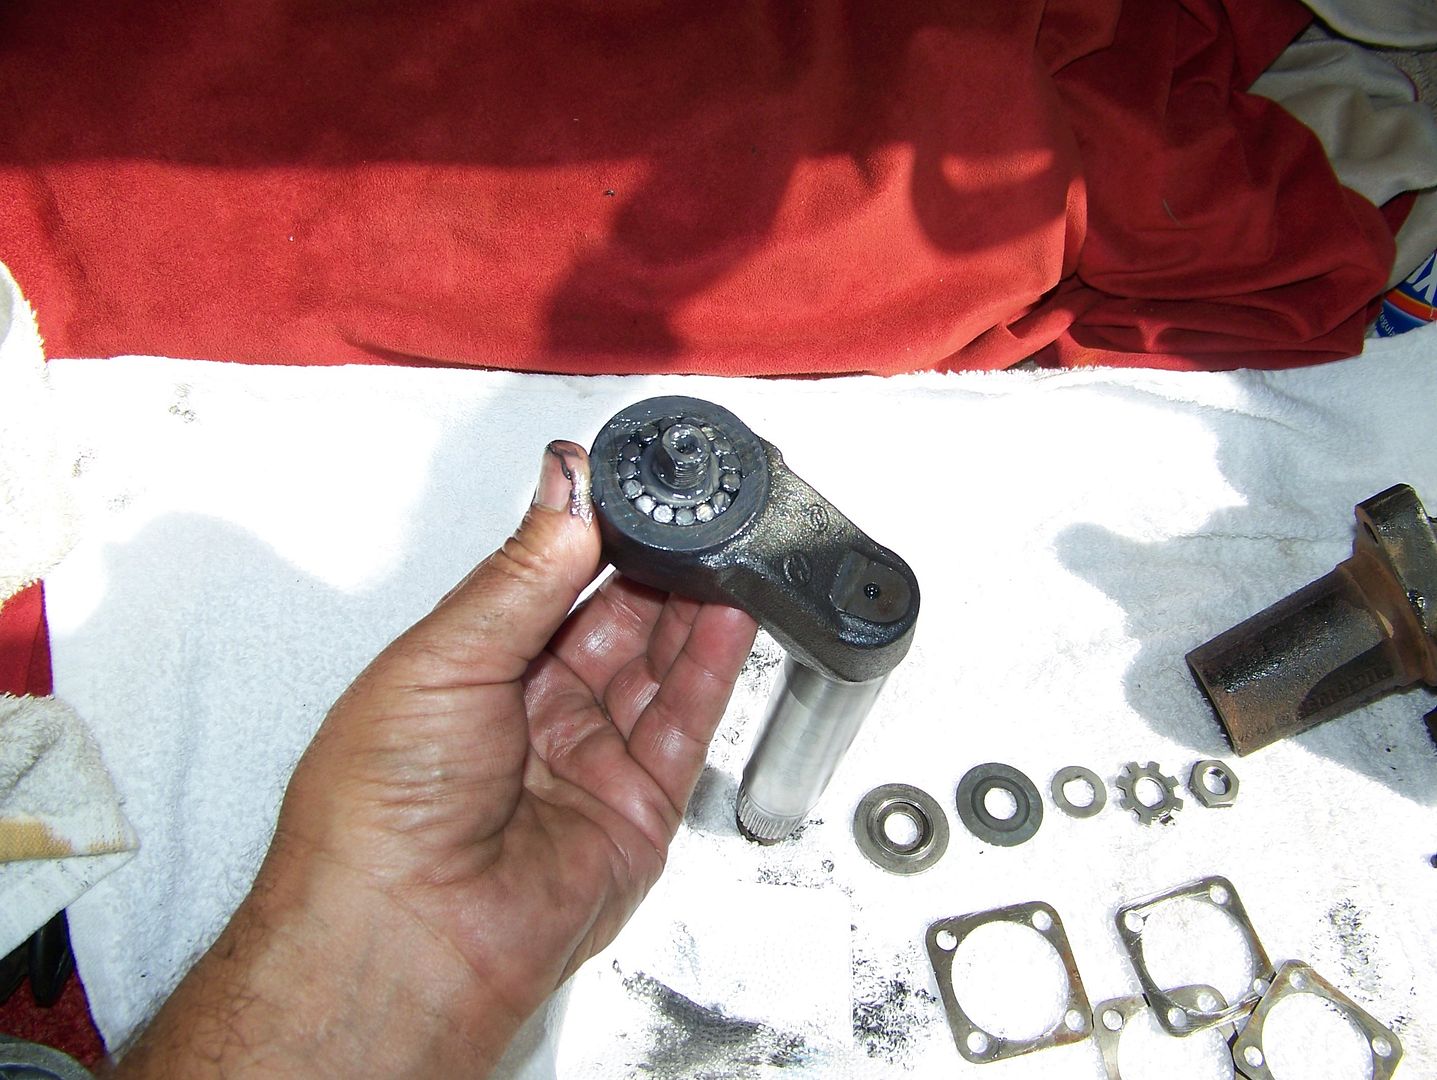
f) Tap the lock tab off the edge of the nut and remove the nut, the lock washer, the keyed washer, the thrust washer, the roller end track washer, and lay them out on your nice clean work counter. Rotate the peg and all these little tapered needle bearings are coming out all over the place. There are sixteen tapered rollers per side:

g) Clean everything beyootifull. I used gasoline. It is easy. Razor the shims flat, razor the seal opening chamfers and the flat surfaces for the end cover and the side cover on the box itself and the covers themselves. Check for galling on all friction surfaces.
Check for wear on the pitman shaft where it rides in the box. If it is a mess, I hear that you can have a cooperative machine shop turn the shaft down a little and press in new bushings into the box itself. Why not? The "big box" rebuilders sure seem to miss this opportunity.
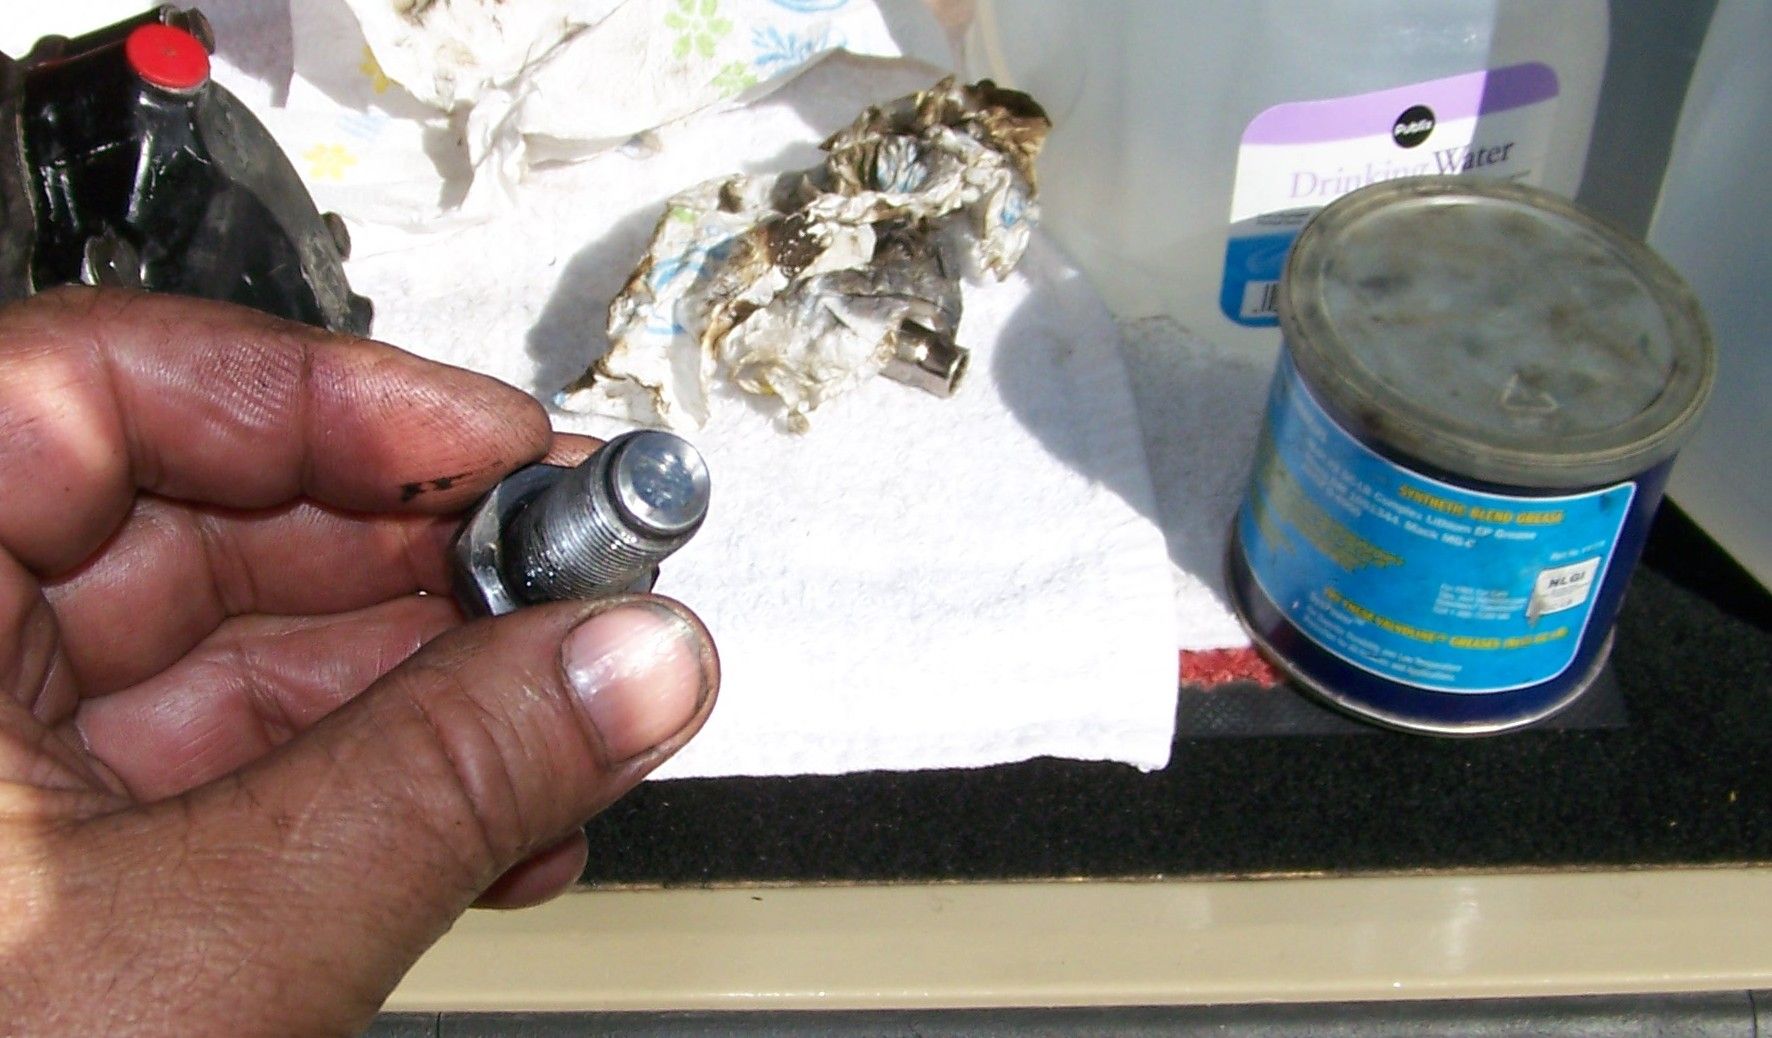
h) Reassembly begins with a blob of Valvoline DuraBlend Semi-Synthetic molybdenum disulfide grease blobbed all over the peg roller race with the shoulder. Then slap sixteen needle bearings with the smaller side towards the center of the vee so that they sit on the shoulder. Very subtle taper in these needle bearings! Be sharp:

i) Stick the blobbed bearings and peg into the pitman shaft arm as shown. You will feel it seat on the bearings, keep pressure up, or you will have a fine mess of sticky little rollers every which way all over:
j) Now drop the other sixteen down between the peg and the pitman arm from this side, smaller diameter goes in first. Rotate the peg with upward pressure to make sure the little rollers understand what they have to do:
k) Critical step here. Install the roller end track washer, the thrust washer, the keyed washer, the lock washer, and the nut. Rotate the peg to make sure it is happy. Now you have to tighten the nut only enough to secure the rollers with a bitty bitty bit of preload, UNLIKE THE LAST GUY. 3 inch/lbs means you apply 3 lbs pressure one inch away from the center of the peg, and it is supposed to rotate. To me, it is just a barely sticky feel but no slop. Turn that nut until it feels slightly slightly sticky, then find a flat on the lock washer that you can tap against a flat edge of the nut You have six flats on the nut, so find the tab on the lock washer that is perfectly aligned and use it to secure the nut:
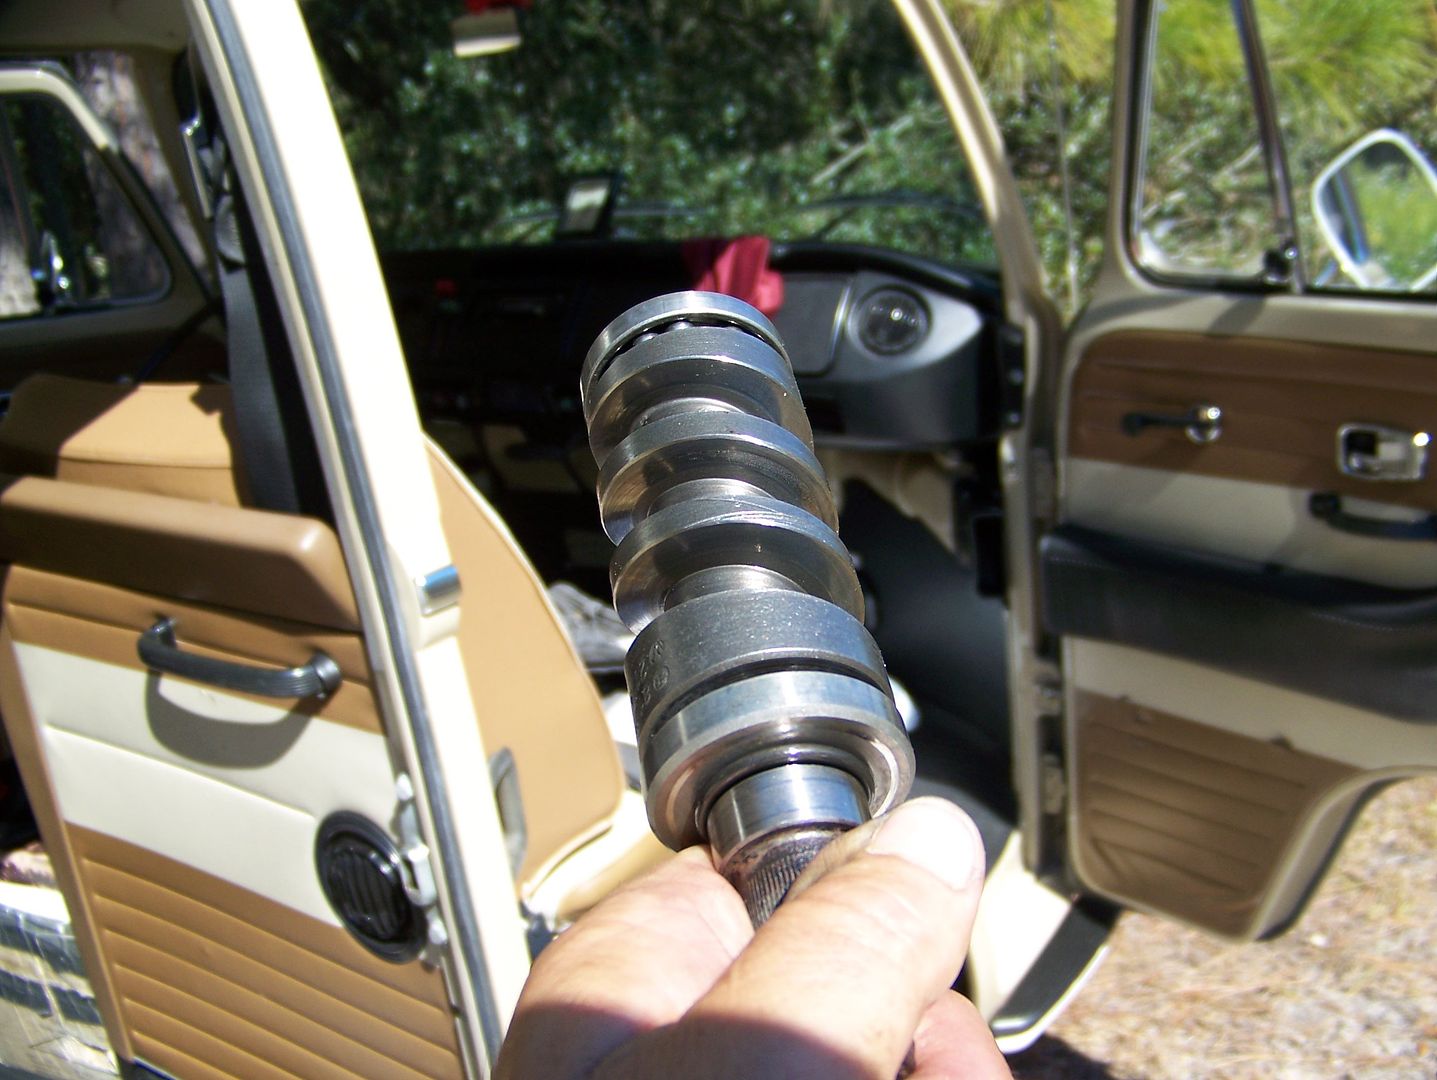
l) It is a kindness to slather pack the steering shaft/worm ball bearings with your grease. Really work it in and do the same with the worm track, both sides. Grease the pitman arm shaft too, and have another blob on the peg-which-rotates-with-barely-any-drag-but-some.
m) Totally easy to tap in new seals now, one for the steering shaft (24X36x7), one for the pitman arm shaft (27x37x7). I got these seals from Bearing Distributors Spartanburg South Carolina for $8.99 and $10.26 will-call pick up (being itinerant) on June 1, 2012 says the invoice. Grease the lips.
n) Here, I have simply stuck in the steering shaft/worm from the end cover hole up through the steering shaft seal. Do a dry run install of the end cover with the four 10mm bolts torqued to 7 ft/lbs.
Does the shaft turn easily?
If easily, remove your thinnest shim. Retorque the end cover and feel for light drag through the exact middle. If it binds, swap shim back in.
Does it turn stiffly?
If it turns stiffly but smoothly, release your 10mm bolts slightly. Does it get easier and smooth still? Either find another shim, or use RTV carefully between each shim and retorque to hand pressure only and let it cure here if it turns smoothly. Then retorque to 7 ft/lbs tomorrow morning and recheck for light drag through the center.
Is it is crusty feeling, regardless of what you do?
You may have an installation error or contamination or terrible bearings/races. Put it all back together nicely anyway and start looking for another box. It might behave well enough once in the car to buy you some time.
o) Put a light coat of Permatex Aviation (case sealant) on the end cover and the box, and torque the four 10mm bolts to 7-9 ft/lbs. Coat the outside perimeter of the shims with a light caramel stripe of sealant:
p) Place the pitman arm shaft in from the gaping side cover opening and get the peg to insert at the middle of the worm. Guide the slines through the seal nicely until the bearing surfaces are supporting the shaft fully:
q) Remove adjustment screw from side cover. Make sure it is smooth and clean at the contact end. All that thing ever does is push the pitman arm sideways so that the peg is making contact with the worm. It is newly obvious to me that this adjustment is critical. It can rip the worm up if too tight, and it cannot take away worn bearing surfaces on the pitman shaft. If your pitman arm is clonking up and down as you wiggle the steering wheel, those bushings are worn, period. I am going to try a Diet Coke can shim on the currently installed grey box pitman arm bearing surface to see if I can cure (hack HACK!) that sucker.
r) Install the side cover without the adjustment screw, using a thin bead of Permatex Aviation as your gasket. Tighten the side cover 13mm bolts to 18 ft/lbs.
Now you can install the adjustment screw until it lightly pushes the pitman shaft home against the side of the steering shaft worm.
s) Install the dust boot and the steering coupler flange. Mine had a 13mm bolt, a rectangular lock plate and a nut that go past a cut-out in the steering shaft just like the relay lever bolt does through the center pin. Tighten the 13mm bolt/nut as you let the coupler flange find its favorite place to be locked down. I had no torque figure for this lock bolt/nut, but let's guess 13 ft/lbs and bend the lock plate ear over both flats on the bolt and the nut
t) You will have this one opportunity to make a center reference mark for the early box. Simply feel for the tight spot as you turn through the center (about 1 and 1/3 turn from lock) Make a chisel mark on the shaft pointing exactly to the notch on the box as seen through the bolt hole. Now you can use any other mark of your choosing that you can see from under the car. I used a dot of white paint on the black dust cap that spins with the steering wheel.

I painted the box on a fir tree branch. Sucker is heavier than my coat hanger likes.

So, the philosophy of this thing is ridiculously simple, but the shape of the worm is ridiculously sophisticated. Our goal is to keep these parts in well-lubricated close proximity so that potholes and boulders do not bang dents into the worm or craters in the bearings.
This steering box was so fine that I never got the opportunity to show you the classic wear points. Do not fret, I have a doozy clonker/skippy in the bus that shall come apart next. I will update this thread.
Colin
a) Loosen the clamp bolt that holds the steering coupler flange to the steering shaft. Tap the flange up and it might release. You might need a puller if it is rusted. Under it is the dust cover which you can pull off with your fingers.
b) Clean the outside of the box like you mean it. Especially clean both the splines on the pitman shaft right to the seal and the steering shaft splines. This is to prevent damage to the seals and bushings as you pull the shafts out.
c) Remove the four 13mm side cover bolts that surround the adjustment screw. It will come right off with all of your steering fluid in slippery pursuit.
d) Pull the pitman shaft/peg assembly out where the cover used to be.
e) Remove the four 10mm end cover bolts. You might need to tap the steering shaft down to help it release. There will an assortment of shims stuck to either the cover or the box. You can press or slide the whole shaft out through the end cover hole.
Now your steering box will look just like this:
But wait! There's more . . .
The peg is supposed to rotate inside the pitman shaft's arm. This is critical. When you are hauling on the steering wheel/shaft (worm track), the peg HAS to "walk" up or down the ramp, which it does by rotating along the ramped surface. If the peg is stuck like this one was, it will skid instead, much like a frozen sliding door roller, causing wear on the priceless worm.
I caught this thing right in the nick of time. Here is just the beginning of what might have galled the worm to death at the very center of the track:
f) Tap the lock tab off the edge of the nut and remove the nut, the lock washer, the keyed washer, the thrust washer, the roller end track washer, and lay them out on your nice clean work counter. Rotate the peg and all these little tapered needle bearings are coming out all over the place. There are sixteen tapered rollers per side:
g) Clean everything beyootifull. I used gasoline. It is easy. Razor the shims flat, razor the seal opening chamfers and the flat surfaces for the end cover and the side cover on the box itself and the covers themselves. Check for galling on all friction surfaces.
Check for wear on the pitman shaft where it rides in the box. If it is a mess, I hear that you can have a cooperative machine shop turn the shaft down a little and press in new bushings into the box itself. Why not? The "big box" rebuilders sure seem to miss this opportunity.
h) Reassembly begins with a blob of Valvoline DuraBlend Semi-Synthetic molybdenum disulfide grease blobbed all over the peg roller race with the shoulder. Then slap sixteen needle bearings with the smaller side towards the center of the vee so that they sit on the shoulder. Very subtle taper in these needle bearings! Be sharp:
i) Stick the blobbed bearings and peg into the pitman shaft arm as shown. You will feel it seat on the bearings, keep pressure up, or you will have a fine mess of sticky little rollers every which way all over:
j) Now drop the other sixteen down between the peg and the pitman arm from this side, smaller diameter goes in first. Rotate the peg with upward pressure to make sure the little rollers understand what they have to do:
k) Critical step here. Install the roller end track washer, the thrust washer, the keyed washer, the lock washer, and the nut. Rotate the peg to make sure it is happy. Now you have to tighten the nut only enough to secure the rollers with a bitty bitty bit of preload, UNLIKE THE LAST GUY. 3 inch/lbs means you apply 3 lbs pressure one inch away from the center of the peg, and it is supposed to rotate. To me, it is just a barely sticky feel but no slop. Turn that nut until it feels slightly slightly sticky, then find a flat on the lock washer that you can tap against a flat edge of the nut You have six flats on the nut, so find the tab on the lock washer that is perfectly aligned and use it to secure the nut:
l) It is a kindness to slather pack the steering shaft/worm ball bearings with your grease. Really work it in and do the same with the worm track, both sides. Grease the pitman arm shaft too, and have another blob on the peg-which-rotates-with-barely-any-drag-but-some.
m) Totally easy to tap in new seals now, one for the steering shaft (24X36x7), one for the pitman arm shaft (27x37x7). I got these seals from Bearing Distributors Spartanburg South Carolina for $8.99 and $10.26 will-call pick up (being itinerant) on June 1, 2012 says the invoice. Grease the lips.
n) Here, I have simply stuck in the steering shaft/worm from the end cover hole up through the steering shaft seal. Do a dry run install of the end cover with the four 10mm bolts torqued to 7 ft/lbs.
Does the shaft turn easily?
If easily, remove your thinnest shim. Retorque the end cover and feel for light drag through the exact middle. If it binds, swap shim back in.
Does it turn stiffly?
If it turns stiffly but smoothly, release your 10mm bolts slightly. Does it get easier and smooth still? Either find another shim, or use RTV carefully between each shim and retorque to hand pressure only and let it cure here if it turns smoothly. Then retorque to 7 ft/lbs tomorrow morning and recheck for light drag through the center.
Is it is crusty feeling, regardless of what you do?
You may have an installation error or contamination or terrible bearings/races. Put it all back together nicely anyway and start looking for another box. It might behave well enough once in the car to buy you some time.
o) Put a light coat of Permatex Aviation (case sealant) on the end cover and the box, and torque the four 10mm bolts to 7-9 ft/lbs. Coat the outside perimeter of the shims with a light caramel stripe of sealant:
p) Place the pitman arm shaft in from the gaping side cover opening and get the peg to insert at the middle of the worm. Guide the slines through the seal nicely until the bearing surfaces are supporting the shaft fully:
q) Remove adjustment screw from side cover. Make sure it is smooth and clean at the contact end. All that thing ever does is push the pitman arm sideways so that the peg is making contact with the worm. It is newly obvious to me that this adjustment is critical. It can rip the worm up if too tight, and it cannot take away worn bearing surfaces on the pitman shaft. If your pitman arm is clonking up and down as you wiggle the steering wheel, those bushings are worn, period. I am going to try a Diet Coke can shim on the currently installed grey box pitman arm bearing surface to see if I can cure (hack HACK!) that sucker.
r) Install the side cover without the adjustment screw, using a thin bead of Permatex Aviation as your gasket. Tighten the side cover 13mm bolts to 18 ft/lbs.
Now you can install the adjustment screw until it lightly pushes the pitman shaft home against the side of the steering shaft worm.
s) Install the dust boot and the steering coupler flange. Mine had a 13mm bolt, a rectangular lock plate and a nut that go past a cut-out in the steering shaft just like the relay lever bolt does through the center pin. Tighten the 13mm bolt/nut as you let the coupler flange find its favorite place to be locked down. I had no torque figure for this lock bolt/nut, but let's guess 13 ft/lbs and bend the lock plate ear over both flats on the bolt and the nut
t) You will have this one opportunity to make a center reference mark for the early box. Simply feel for the tight spot as you turn through the center (about 1 and 1/3 turn from lock) Make a chisel mark on the shaft pointing exactly to the notch on the box as seen through the bolt hole. Now you can use any other mark of your choosing that you can see from under the car. I used a dot of white paint on the black dust cap that spins with the steering wheel.
I painted the box on a fir tree branch. Sucker is heavier than my coat hanger likes.
So, the philosophy of this thing is ridiculously simple, but the shape of the worm is ridiculously sophisticated. Our goal is to keep these parts in well-lubricated close proximity so that potholes and boulders do not bang dents into the worm or craters in the bearings.
This steering box was so fine that I never got the opportunity to show you the classic wear points. Do not fret, I have a doozy clonker/skippy in the bus that shall come apart next. I will update this thread.
Colin

