Page 2 of 4
Posted: Mon Jul 06, 2009 5:33 pm
by Bleyseng
finally some parts came in the mail and now the gas gauge works...

Posted: Sat Jul 11, 2009 4:15 pm
by Bleyseng
More parts came so it was time to do the new ball joints and tie rod ends install. I pulled everything apart on Friday and found a old shop that would install my new balljoints and push out the old sloppy ones. Now this was hard to find around Beacon Hill in Seattle as the old auto shops are mostly gone!
I took apart the tie rods and found they were bent badly and had tons play in them, great. With some effort they came apart and new ones were screwed back in to the same center to center measurements to keep the toe-in half way close.
shot of control arms off...
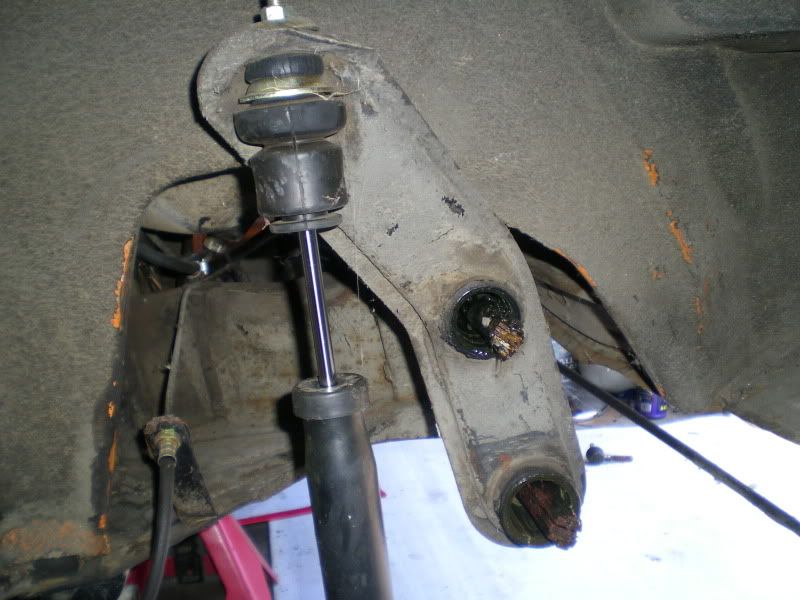
All back together and cleaned up..

yes, the Ghia came with new brakes and new Mexican Boge shocks..I cut off the stock rusted on sway bar and will order a 3/4" sway bar to settle the front down...If money allows, Koni's will go on too..
Posted: Tue Jul 14, 2009 7:34 am
by Bleyseng
The engine compartment seals came today, has anyone put these in without taking out the engine?
I am thinking about pulling the engine anyway to clean up everything as its pretty grossly dirty/greasey/grimey.
Not trying to match Bookwus in perfection but just clean and no oil leaks..
Posted: Wed Sep 02, 2009 5:41 am
by Bleyseng
after a months stay in europe visiting M's sister (tough duty, but I managed) I returned to a big box of Ghia parts I ordered.
Spent the day installing new window scrappers, new upper hinge, new vert window seals on the drivers door. Also installed a new plastic guide tube and cable release for the engine compartment, new front turn signal lenes, sorted out the goofy turnsignal wiring, and ran new wires in the window channel so the interior lite works finally. That last job nearly kicked my butt and I'd like to shoot the idiot who cut those wires or rather ripped them out so they shorted out that circuit..

Took me awhile to figure out these were the problem and even longer to install new wiring in the channel but its rewarding to open the door now and have the interior lite come on.
Still haven't installed the engine compartment seals...
update
Posted: Sun Dec 13, 2009 9:22 am
by Bleyseng
Well this fall I did manage to replace the window seals, scrapers, felt, and window winder mech. on the drivers doors. I can't find any instructions of how to adjust everything to fit correctly and adjust the glass! So the drivers window doesn't leak but its really hard to wind up and down due to the glass rubbing against the seal.
Finally bought and located the missing bumper parts but time and my bad shoulder have stopped me from installing all of these parts.
I also located a set of good heater tubes from Ken@thebusco. as I went out to his place for some other bus parts and he had a few misc bug parts I bought. A real bug jack was one part so now I have a jack in the Ghia. Who throws those away anyhow? I haven't installed the heater tubes and repair one of the heat exchanger levers to get heat. So the car is sitting in a nice warm garage until I do this..
I installed the proper fasteners and seals on the rear glass so it doesn't rattle or leak, yay! Now I am still trying to repair the wiring to the rear glass heater as that was ripped out by the PO. Why? I can't figure out....
My shoulder reconstructive surgery on Nov 30th went well, now 6 weeks in a sling and no car fun! Aiya, I am going to have to cheat on this as I have too much to do. I did order new door panels, dash and a carpet kit in Oatmeal to atleast get the interior decentl.
I want the Ghia driving around again this winter and have a pile of parts to install. I'll enlist my son to help some as he also needs help on his 914.
Posted: Tue Dec 15, 2009 3:30 pm
by Gypsie
sounds like you've been productive.
Let yourself heal proper like so's you can keep spreadin' the dub love longer on the other side of the healin'.
Pix if you have em.
Posted: Tue Dec 15, 2009 6:15 pm
by Amskeptic
Bleyseng wrote:The engine compartment seals came today, has anyone put these in without taking out the engine?
I am thinking about pulling the engine anyway to clean up everything as its pretty grossly dirty/greasey/grimey.
Not trying to match Bookwus in perfection but just clean and no oil leaks..
If you do not mind beaver-chewing the groove lip open with Vise Grips, stuffing the seal in, and tapping the lip back down with splintered paint all over, it is doable installed. I'd remove the engine, get some spray lubricant, get an edge started and try a slide around into place.
Colin
Re: update
Posted: Tue Dec 15, 2009 6:17 pm
by Amskeptic
Bleyseng wrote:Well this fall I did manage to replace the window seals, scrapers, felt, and window winder mech. on the drivers doors. I can't find any instructions of how to adjust everything to fit correctly and adjust the glass! So the drivers window doesn't leak but its really hard to wind up and down due to the glass rubbing against the seal.
Bentley should have instructions. I don't. I could tell you that I would loosen the window regulator lift at the glass, and make the glass level across the top. I would loosen the vent window frame and see what movement I had then make it where I want it. . . .
Colin
Posted: Tue Dec 15, 2009 9:25 pm
by Bleyseng
yeah, on the engine seals I did that. Lots of lube to install the new seals in the track after straightening out all the crimps.
No, Bentley doesn't have instructions for a Ghia so I am winging it. I just hoped for a step by step process so I didn't have to wing it. Its tough getting the alignment right and have it seal!!!! The 914 is easier to adjust by far.
oh, for a Xmas present to myself I ordered new carpet for the Ghia and a new windshield seal as it leaks like crazy in the rain. That should be fun to install.
Posted: Tue Dec 15, 2009 10:34 pm
by Amskeptic
Bleyseng wrote:yeah, on the engine seals I did that. Lots of lube to install the new seals in the track after straightening out all the crimps.
No, Bentley doesn't have instructions for a Ghia so I am winging it. I just hoped for a step by step process so I didn't have to wing it. Its tough getting the alignment right and have it seal!!!! The 914 is easier to adjust by far.
oh, for a Xmas present to myself I ordered new carpet for the Ghia and a new windshield seal as it leaks like crazy in the rain. That should be fun to install.
Check wiper pivots carefully as well. I could have had the nice fresh chrome surround on my Squareback if someone hadn't replaced the windshield seal when it really was the left wiper pivot piddling on the carpet.
Colin
Posted: Wed Dec 16, 2009 1:22 am
by ruckman101
Sheesh, we've just been driving ours. Envious. Although, I did take Hal's advice and the roof dent from the cottonwood limb is much less noticeable.
neal
Posted: Wed Dec 16, 2009 7:37 am
by Bleyseng
Amskeptic wrote:Bleyseng wrote:yeah, on the engine seals I did that. Lots of lube to install the new seals in the track after straightening out all the crimps.
No, Bentley doesn't have instructions for a Ghia so I am winging it. I just hoped for a step by step process so I didn't have to wing it. Its tough getting the alignment right and have it seal!!!! The 914 is easier to adjust by far.
oh, for a Xmas present to myself I ordered new carpet for the Ghia and a new windshield seal as it leaks like crazy in the rain. That should be fun to install.
Check wiper pivots carefully as well. I could have had the nice fresh chrome surround on my Squareback if someone hadn't replaced the windshield seal when it really was the left wiper pivot piddling on the carpet.
Colin
good call, I'll order some of those and swap em out.. =D>
I know the windshield seal is shot, its all cracked/split and pulled away from the frame. I'll keep the chrome trim and reinstall it with the new seal. The windshield is in pretty good shape without too much pitting, not rock chips.
Posted: Thu Jan 14, 2010 10:16 am
by Bleyseng
Spend all day rebuilding the rear bumper..
Every bolt snapped when I tried to loosen them but Cobalt drill bits and Easy outs plus a set of metric taps fixed that. Thought I had bought all the bumper gaskets I needed but I missed the overrider ones, darn. Still it finally went back together like it should and is sturdy for once as I mounted the missing braces.
Today I'll tackle the windshield and the dash replacement if time allows.
I have my son helping as I still can only use one arm

but we make a good team fixing stuff..
I hope to get the leaks fixed so I can drive the car soon..
Posted: Thu Jan 14, 2010 10:31 am
by hambone
If you do not mind beaver-chewing the groove lip open with Vise Grips, stuffing the seal in, and tapping the lip back down with splintered paint all over, it is doable installed. I'd remove the engine, get some spray lubricant, get an edge started and try a slide around into place.
Colin
Wolfsburg West sells their own make of engine seal. They are slightly thinner and kind of floppy like swim flippers. I was able to jockey them into place with the engine installed (but still not totally tightened down) in the bus. They seem to seal better than original due to their floppy nature.
Posted: Thu Jan 14, 2010 9:16 pm
by Bleyseng
Engine seal is in and it wasn't too hard to do...lots of elbow grease.
Today I just worked on fixed the horn button, all new bolts, washers, springs etc so it actually works like it should..love the dual tone horns finally blasting out.
Found some chrome polish and rubbed out the rear bumper so it looks fairly decent now.
Started to track down the rear license plate lites wires as it has no 12v power to it.
I looked at the heat exchangers and I need to pull em and close the metal around the piping so they don't leak so much. Maybe weld em up?